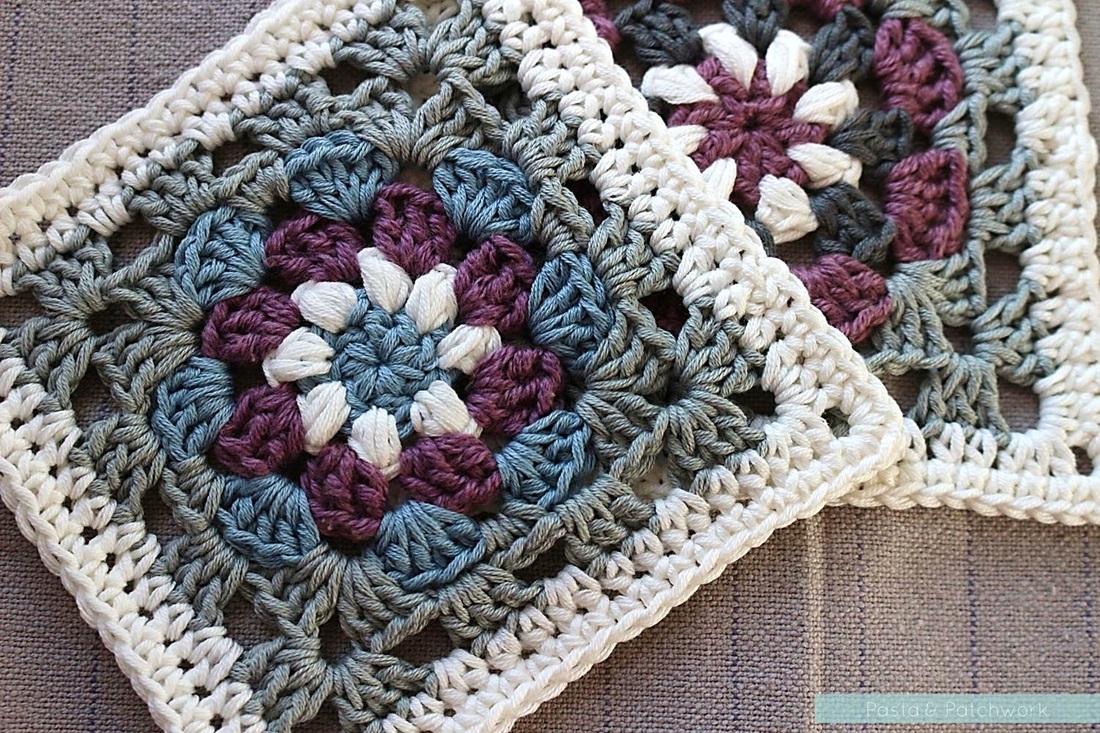
Another month, another granny square! Last month I shared the all the patterns for the completed green section of the "Crochet meets Patchwork" blanket with you, and now I've moved on the the pink section. It's almost ready to share with you, so do check back soon!
In the meantime I'll show you how to make this simple and pretty granny square.
In the meantime I'll show you how to make this simple and pretty granny square.
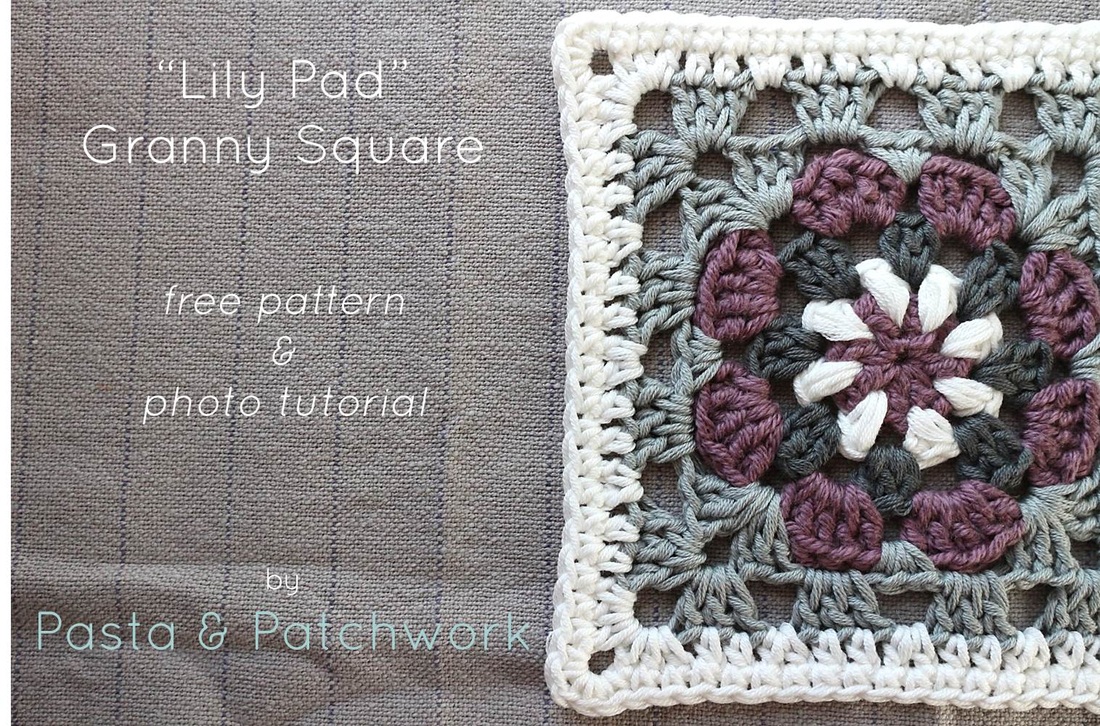
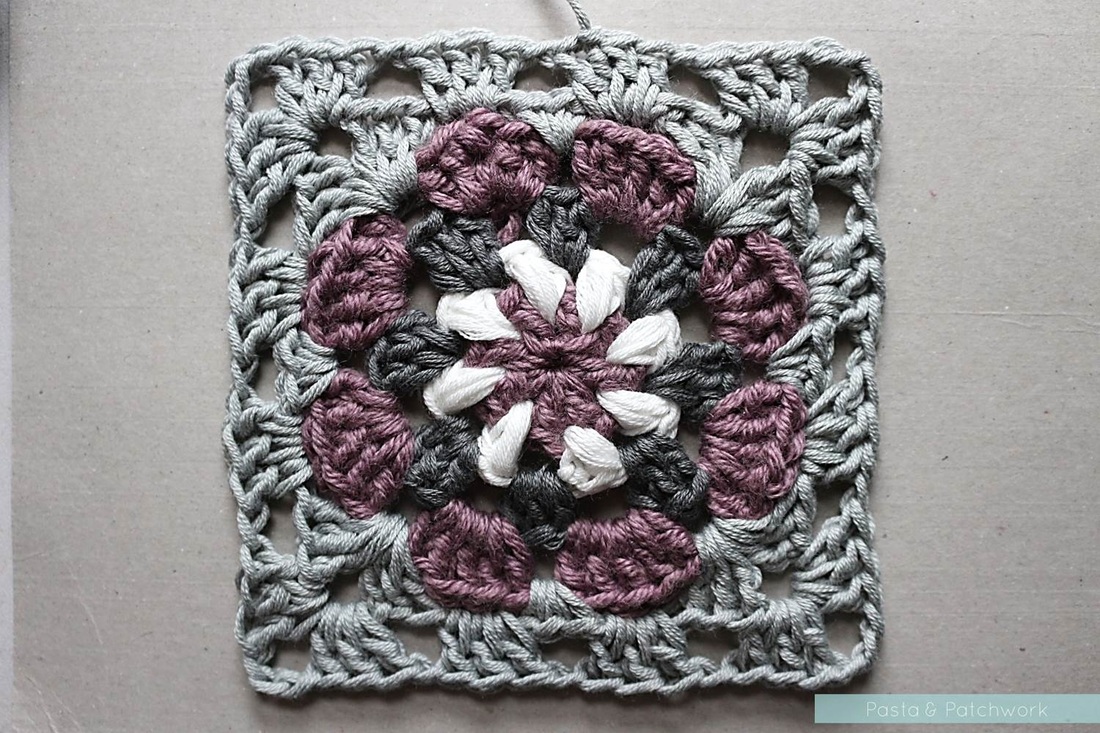
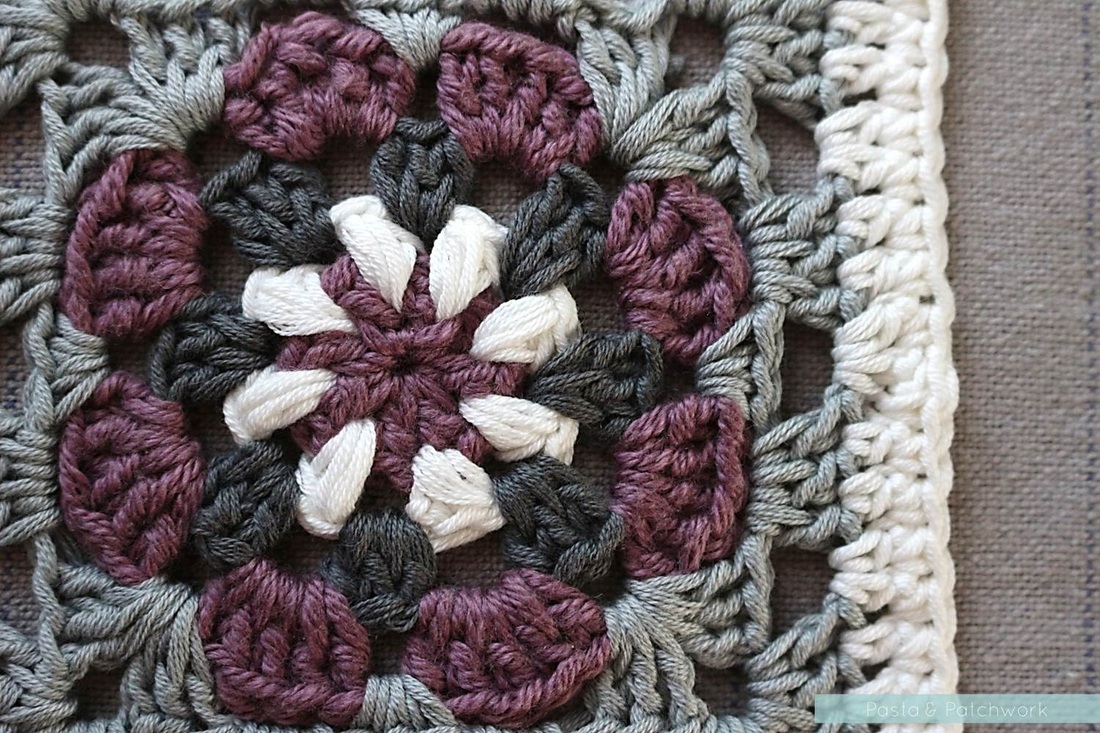
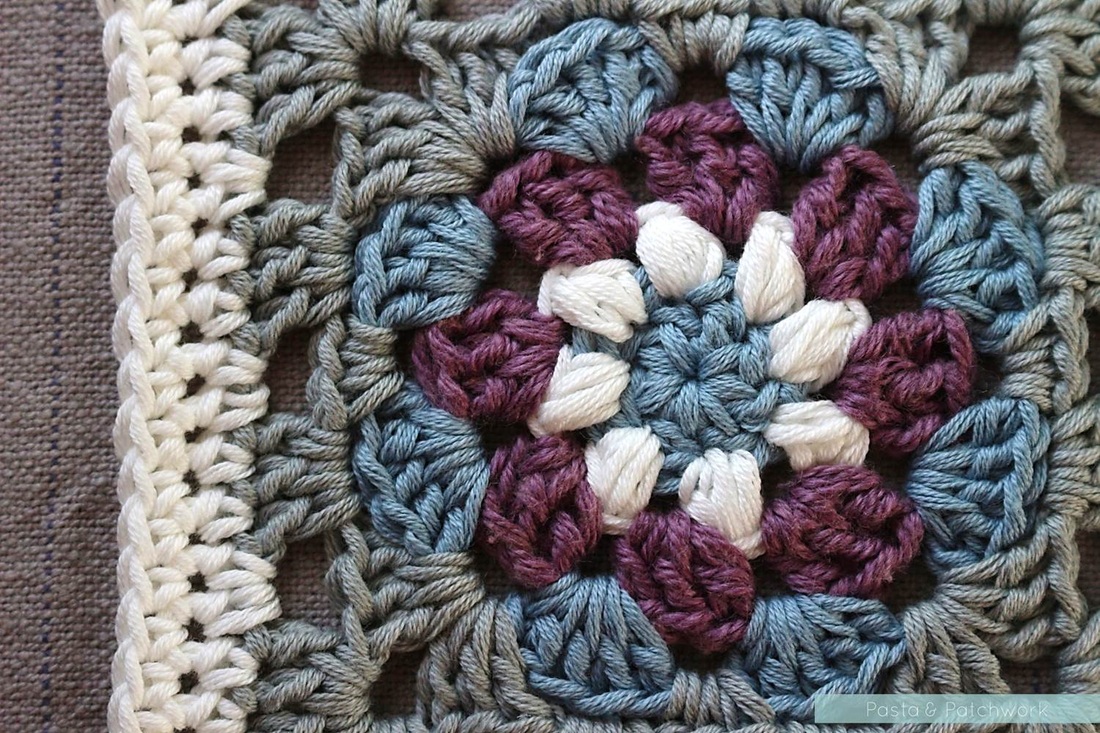
The inspiration for the colour scheme came from this pin I found (with a little help from my lovely little sister-in-law). I think it's just yummy, and I hope you'll like it too. Do excuse the slightly shabby, fluffy appearance of the purple yarn though - it is in fact salvaged yarn and, as a result, a bit beaten up!
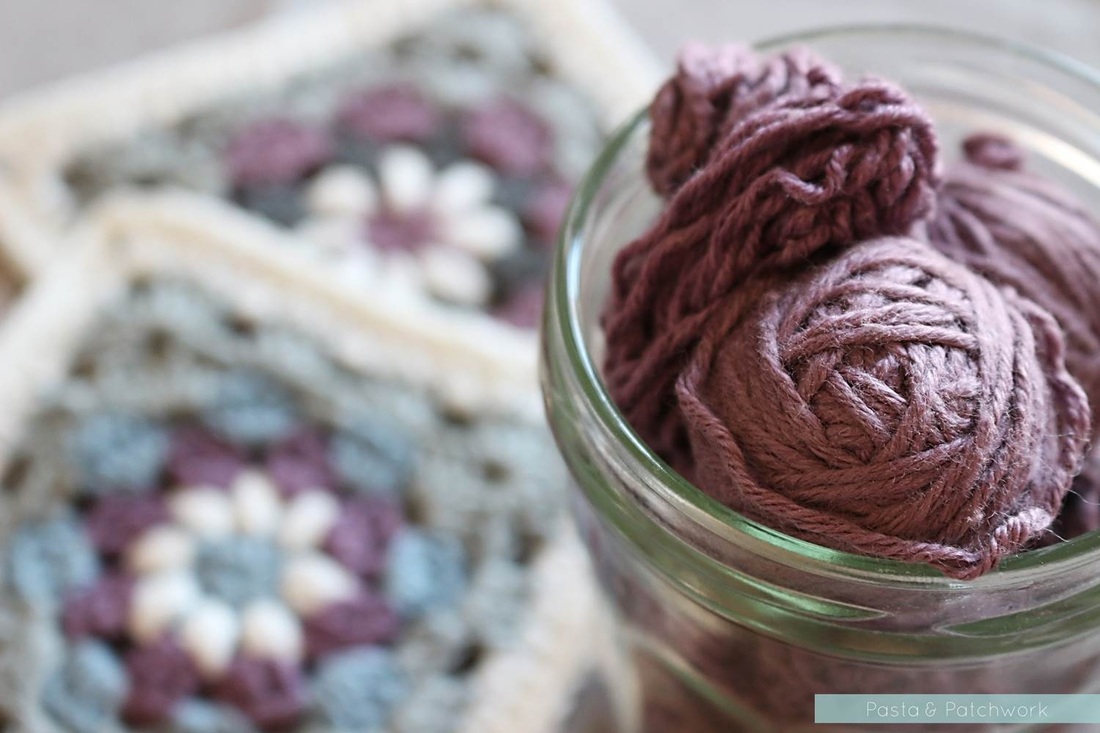
Also bear in mind that the purple yarn is heavier than the others. I don't have the label but I do know it's by Rowan, and it's a mixture of cotton and wool, probably about Sport weight. I never really worry about mixing yarn types and weights, but don't feel like you have to follow my lead. As an alternative, you could use Natura Just Cotton in Orquidea.
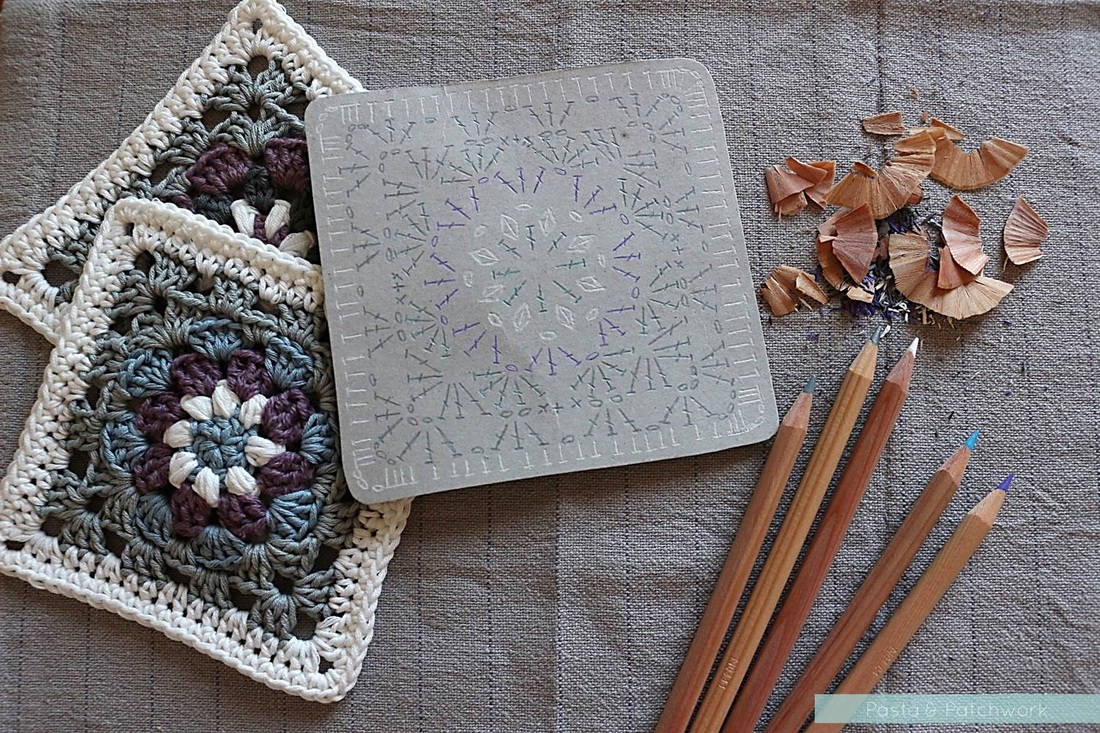
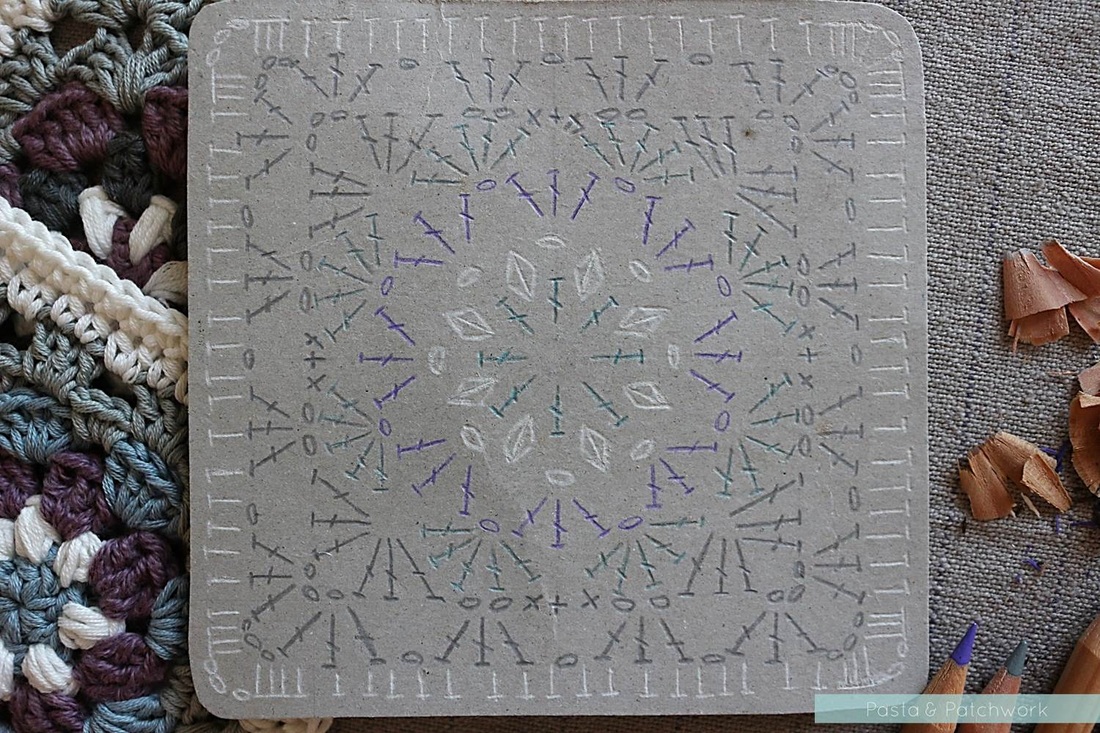
For this pattern I've done my best, as always, to provide both photos and written instructions. For the first time I have also included a diagram. Or at least, I've tried! I learned to read crochet diagrams last summer, and have found it an invaluable skill since. Not only does it allow me to have a go at crochet patterns for which the instructions are in another language but, as a visual person, it really helps me to get to grips even with patterns that are written in English. For this pattern I therefore thought I'd have a go at drawing a diagram myself, but I think you'll agree I need a little more practice... Still, it was a lot of fun to play with my long-neglected pencils again!
For this pattern I've done my best, as always, to provide both photos and written instructions. For the first time I have also included a diagram. Or at least, I've tried! I learned to read crochet diagrams last summer, and have found it an invaluable skill since. Not only does it allow me to have a go at crochet patterns for which the instructions are in another language but, as a visual person, it really helps me to get to grips even with patterns that are written in English. For this pattern I therefore thought I'd have a go at drawing a diagram myself, but I think you'll agree I need a little more practice... Still, it was a lot of fun to play with my long-neglected pencils again!
The final thing to note is that I've started the rounds of TCs & DCs with what is known as a "standing treble/double crochet" when attaching a new colour, and a "chainless starting treble/double crochet" when continuing with the same colour. It removes the need for 2-3 starting chains, and so the beginning of each round is less conspicuous. If you're not familiar with these techniques, have a look at these excellent tutorials on moogly:
Standing treble/double crochet
Chainless starting treble /double crochet
If you're not comfortable with these techniques, however, there is of course nothing wrong with sticking to the usual chain starts. For this reason I've included alternative instructions where applicable.
Standing treble/double crochet
Chainless starting treble /double crochet
If you're not comfortable with these techniques, however, there is of course nothing wrong with sticking to the usual chain starts. For this reason I've included alternative instructions where applicable.
"Lily Pad" Crochet Square
Notes:
UK terms (with US terms in brackets)
3.5 mm (E/4) hook
DMC Natura Just Cotton fingering yarn
Colours: Orquidea/Azur (A), Ivory (B), Aswan/Orquidea(C), Gris Argent (D)
square size: 12 cm x 12 cm (ca. 5" by 5")
stitches: puff stitch - puff st.; treble crochet - TC (double crochet - DC); standing treble crochet - STC (standing double crochet - SDC); chainless starting treble crochet - CSTC (chainless starting double crochet (CSDC); half treble crochet - HTC (half double crochet - HDC); double crochet - DC (single crochet - SC); chain - ch (chain stitch - ch); slip stitch - sl.st.
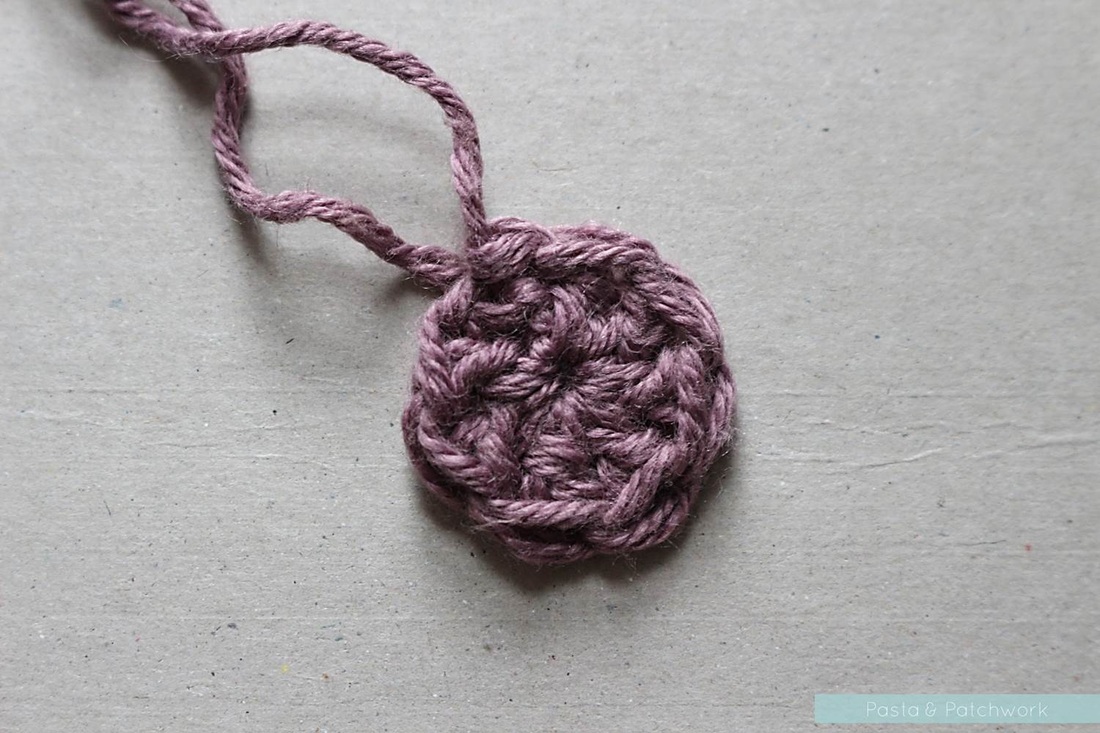
Round 1:
With colour A, make a starting chain of 4-5, then make into a circle with a sl.st into the first ch.
Round 2:
STC (SDC) 1, then TC (DC) 7 into the circle. Join to STC (SDC) with a sl.st. Fasten off. (8 st)
OR
Ch 3, then TC (DC) 7 into the circle. Join to the 3rd ch with a sl.st. Fasten off. (8 st)
With colour A, make a starting chain of 4-5, then make into a circle with a sl.st into the first ch.
Round 2:
STC (SDC) 1, then TC (DC) 7 into the circle. Join to STC (SDC) with a sl.st. Fasten off. (8 st)
OR
Ch 3, then TC (DC) 7 into the circle. Join to the 3rd ch with a sl.st. Fasten off. (8 st)
Round 3:
Attach colour B to any st. of the previous round and ch 1 (you should now have what looks like 2 chains).
Attach colour B to any st. of the previous round and ch 1 (you should now have what looks like 2 chains).
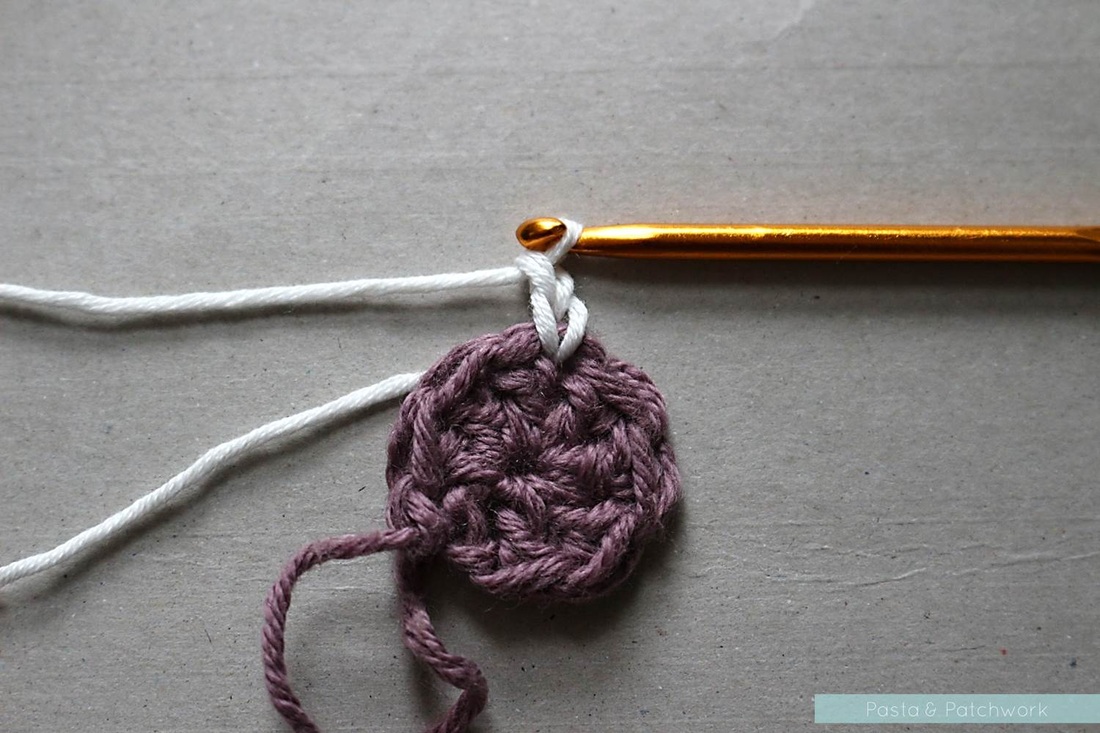
Into the same st., yarn over and pull up a loop twice. Yarn over again and pull through all the loops on your hook. Ch 1 to lock.
Into each of the remaining 7 stitches, make a puff st. followed by a ch 1. Join to the 1st ch (the one you made after attaching your yarn) with a sl. st. Fasten off. (16 st)
Into each of the remaining 7 stitches, make a puff st. followed by a ch 1. Join to the 1st ch (the one you made after attaching your yarn) with a sl. st. Fasten off. (16 st)
|
|
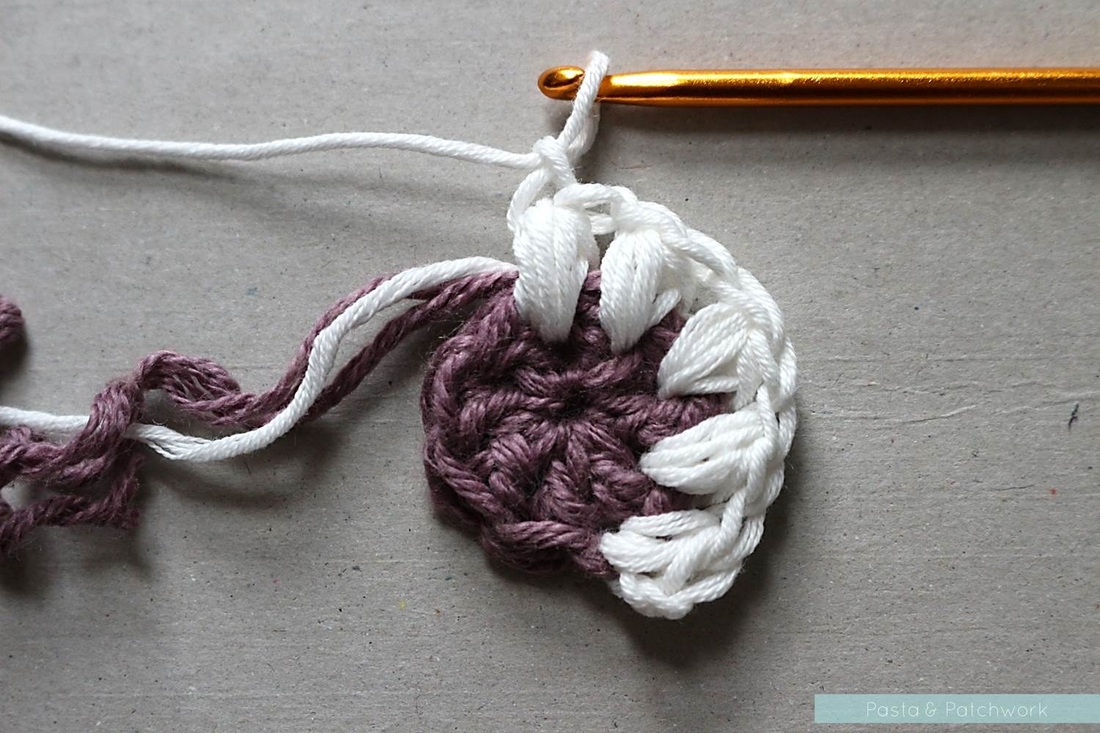
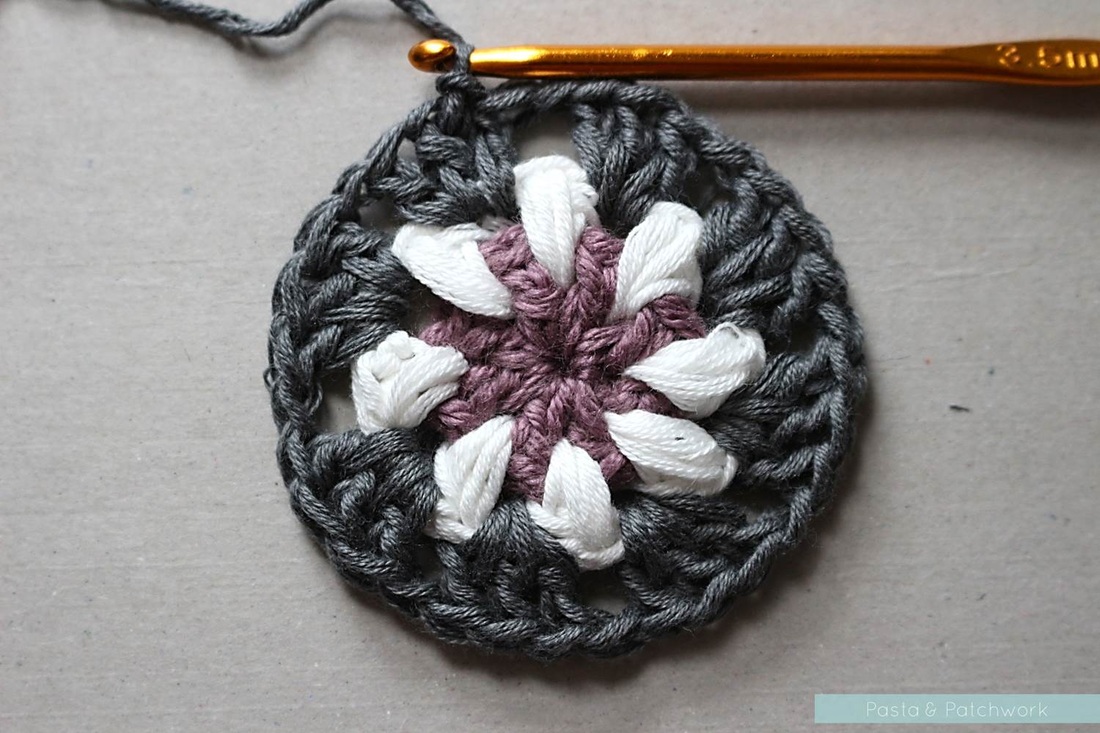
Round 4:
With colour (C), make a STC (SDC) into any ch 1 space. TC (DC) 1 into the same space, ch 1. * In the next ch 1 space, TC (DC) 3, ch 1. Repeat from * seven times, into each remaining ch 1 space. TC (DC) 1 into the same space as the STC (SDC), then join to STC (SDC) with a sl. st. Fasten off.
OR
Attach colour (C) into any ch 1 space and ch 2. TC (DC) 1 into the same space, ch 1. * In the next ch 1 space, TC (DC) 3, ch 1. Repeat from * seven times, into each remaining ch 1 space. TC (DC) 1 into the same space as the starting chain. Join to the 2nd chain with a sl. st. Fasten off.
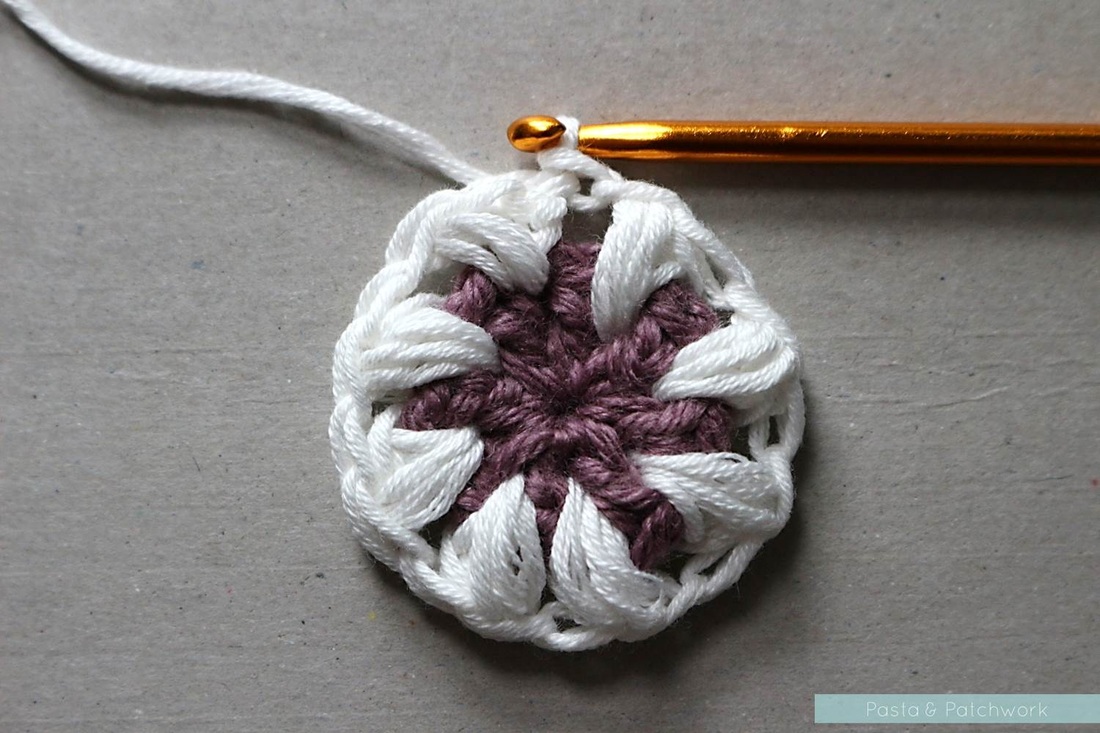
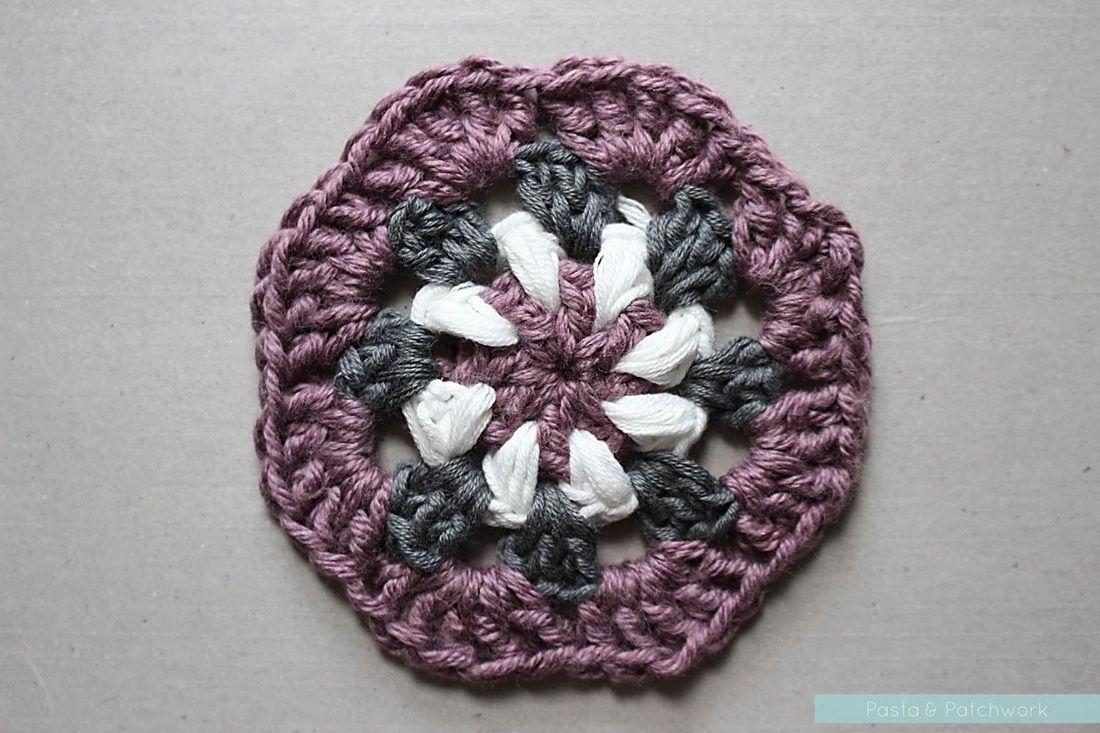
Round 5:
With colour (A), make a STC (SDC) into any ch 1 space. TC 2 into the same space. * In the next ch 1 space, TC (DC) 5. Repeat from * seven times, into each remaining ch 1 space. TC (DC) 2 into the same space as the STC (SDC), then join to STC (SDC) with a sl. st. Fasten off.
OR
Attach colour (A) into any ch 1 space and ch 2. TC (DC) 2 into the same space. * In the next ch 1 space, TC (DC) 5. Repeat from * seven times, into each remaining ch 1 space. TC (DC) 2 into the same space as the starting chain. Join to the 2nd chain with a sl. st. Fasten off.
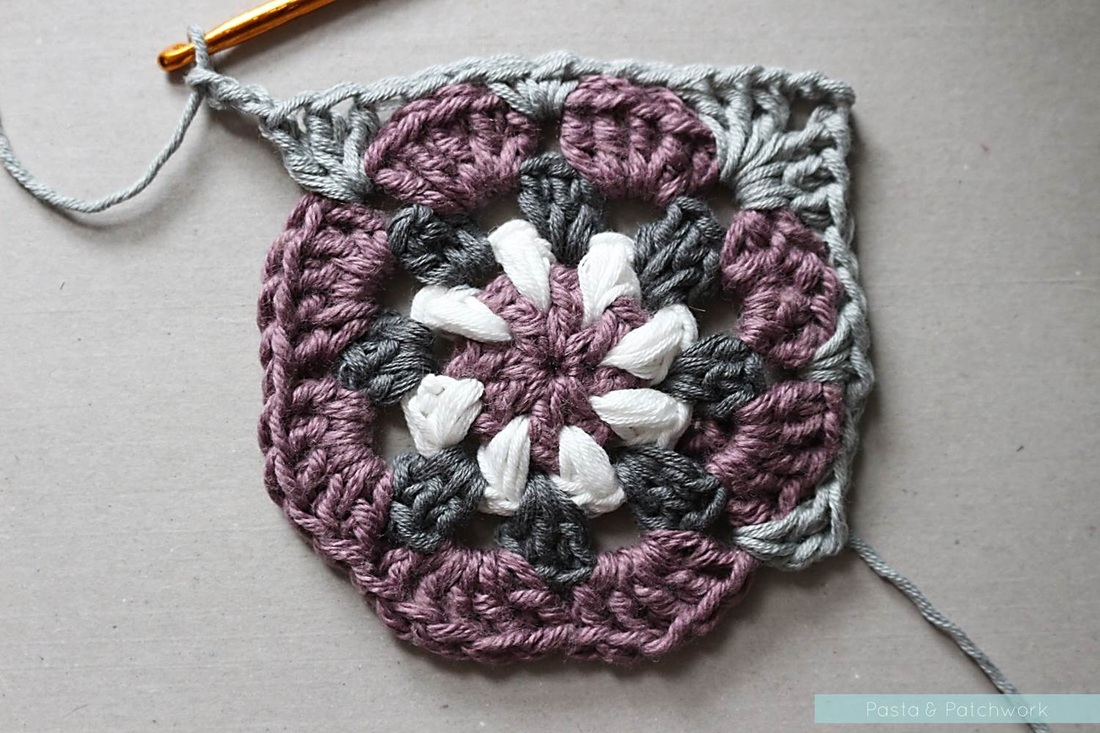
Round 6:
With colour (D), make a STC (SDC) between any two groups of TCs (DCs). TC (DC) 1 into the same space, ch 2. In the next space, DC (SC) 3, ch 2. * In the next space, TC (DC) 3, ch 3, TC (DC) 3, ch 3. In the next space, DC (SC) 3, ch 2. Repeat from * until you've gone all the way around.
TC (DC) 3 into same space as the STC (SDC), ch 3, TC (DC) 1, then join to STC (SDC) with a sl. st.
OR
Attach colour (D) into any ch 1 space between any two groups of TCs (DCs) and ch 2. TC (DC) 1 into the same space, ch 2. In the next space, DC (SC) 3, ch 2. * In the next space, TC (DC) 3, ch 3, TC (DC) 3, ch 3. In the next space, DC (SC) 3, ch 2. Repeat from * until you've gone all the way around.
TC (DC) 3 into the same space as the starting chain, ch 3, TC (DC) 3, then join to the 2nd chain with a sl. st.
|
|
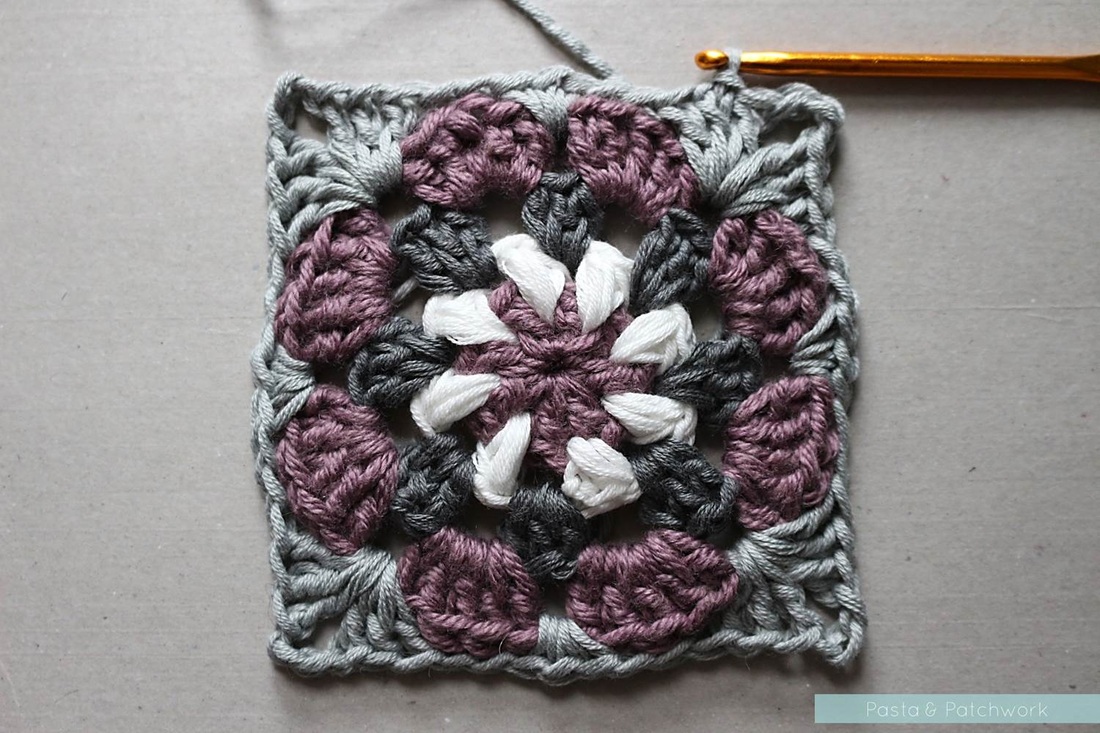
Round 7:
Ch 1 over the TC (DC) of round 6 to get to the ch 2 space. Make a CSTC (CSDC) into this chain 2 space, followed by one TC (DC) into the same space. Ch 1. In the next space, TC (DC) 3, ch 1. * In the next space (i.e. the corner) TC (DC) 3, ch 3, TC (DC) 3. Into each of the next two spaces, TC (DC) 3, ch 1. Then TC (DC) 3, ch 3, TC (DC) 3 on the corner. Repeat until you've gone all the way round.
TC (DC) 1 into the same space as the CSTC (CSDC), then join to the CSTC (SCDC) with a sl. st. Fasten off.
OR
Ch 1 over the TC (DC) of round 6 to get to the ch 2 space. Ch 3, followed by one TC (DC) into the same space. Ch 1. In the next space, TC (DC) 3, ch 1. * In the next space (i.e. the corner) TC (DC) 3, ch 3, TC (DC) 3. Into each of the next two spaces, TC (DC) 3, ch 1. Then TC (DC) 3, ch 3, TC (DC) 3 on the corner. Repeat until you've gone all the way round.
TC (DC) 1 into the same space as the starting chain, then join to the 3rd chain with a sl. st. Fasten off.
Round 8:
With colour (B), make a SHTC (SHDC) into any ch 1 space, followed by one HTC (HDC) into the same space. Now continue to the corner by making one HTC (HDC) in each TC (DC) of the previous round, and two HTC (HDC) into each ch 1 space.
When you reach the corner, HTC (HDC) 3, ch 3, HTC (HDC) 3. Continue like this until you've gone all the way round, then join to the SHTC (SHDC) with a sl. st.
OR
Attach colour (B) into any ch 1 space and ch 1, followed by one HTC (HDC) into the same space. Now continue to the corner by making one HTC (HDC) in each TC (DC) of the previous round, and two HTC (HDC) into each ch 1 space.
When you reach the corner, HTC (HDC) 3, ch 3, HTC (HDC) 3. Continue like this until you've gone all the way round, then join to the starting chain with a sl. st.
Optional round 9:
Depending on how this square fits into your overall project, you might like to finish it off by doing a round of DCs (SCs) into each st., as I've done. On the corners, work DC (SC) 2, ch 1, DC (SC) 2.
Depending on how this square fits into your overall project, you might like to finish it off by doing a round of DCs (SCs) into each st., as I've done. On the corners, work DC (SC) 2, ch 1, DC (SC) 2.
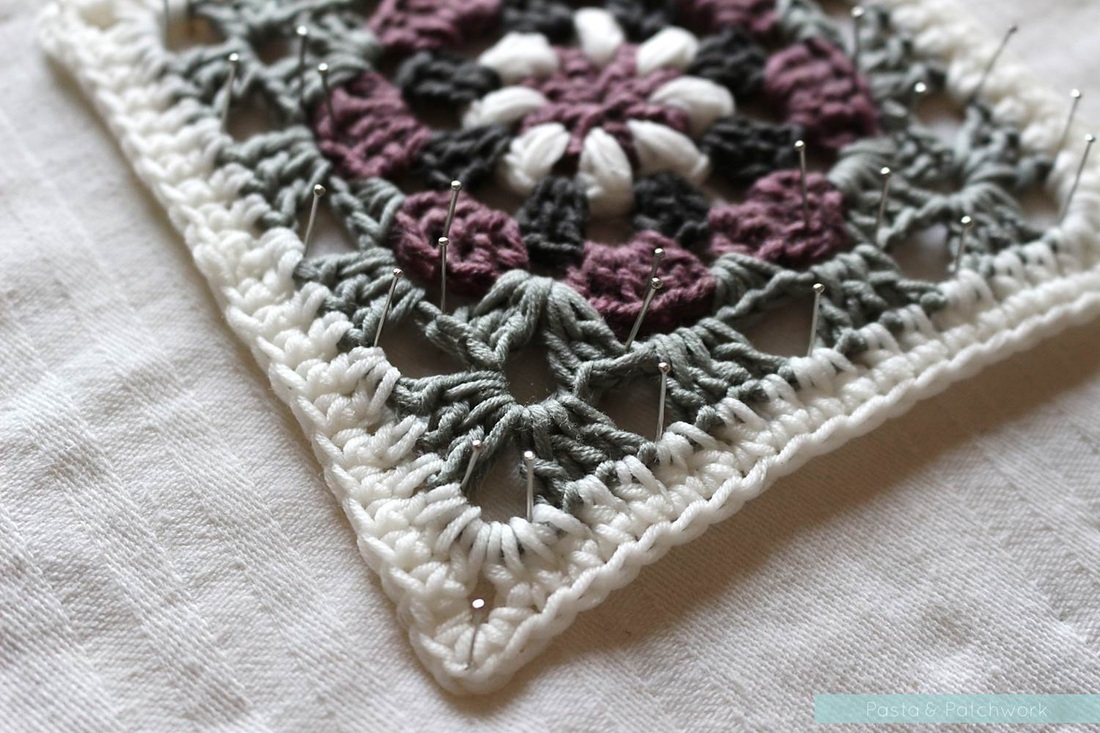
Taaddaaaa!! And though I know I hammer on about this every time, now is the time to block that square. It's not hard and it really does make a huge difference to how the finished square looks. The image below left is all unblocked and wonk-tastic, while the one on the right is nice and neat.
|
|
My preferred blocking method, for cottons at least, is to place the piece on a foam pad covered in a sheet or pillow case, spray it with water until soaked through, and then to pin it into the desired shape. I then leave it near a radiator or window (but never in direct sunlight) until it's completely dry.
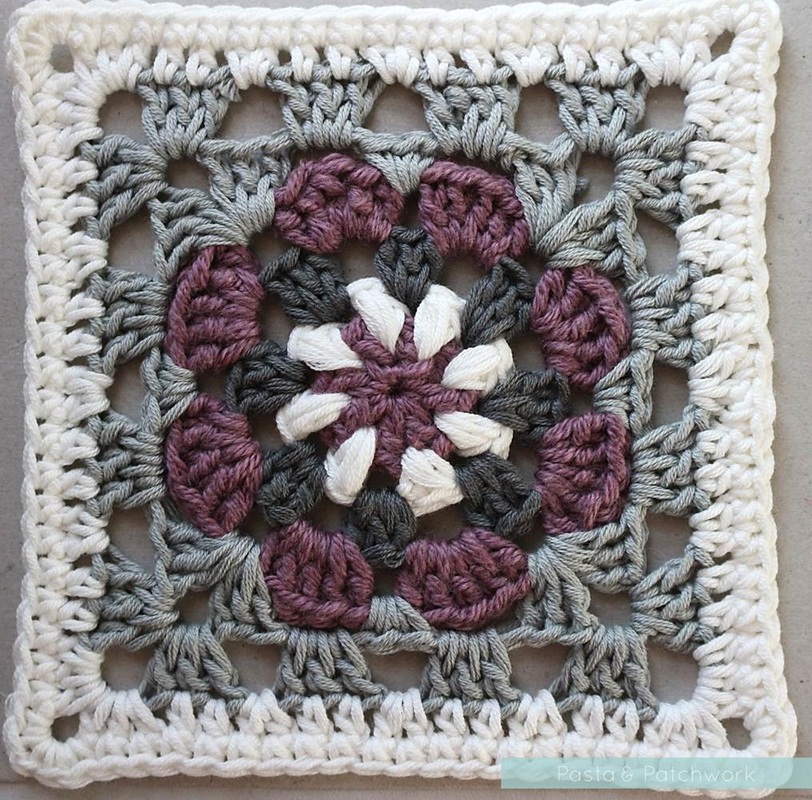
So there you have it, the "Lily Pad" Square, in two colour schemes. Which one do you prefer? I think I should do one that puts all the shades together :-)
Written pattern copyright Eline Alcocer 2015.
You are welcome to make and use this pattern as you wish, but please do not sell the pattern nor claim the pattern as your own.
You are welcome to sell items made using this pattern as long as the designer, Eline Alcocer, is clearly credited at the Point of Sale.
Please link back to this page if you write about the pattern in any way.
You may not reproduce, either partially or in full, any of the photos or the text contained in this post without obtaining written permission from me first.
Thank you and happy crocheting!
I'm linking up with Moogly and Petals to Picots for Hookin on Hump Day #92
Come say hello: