't Was one of those days when I went to my favourite yarn store to get a couple of balls, and I came back with rather more. In my haul was a lovely and thick DK called Rainbow Red.
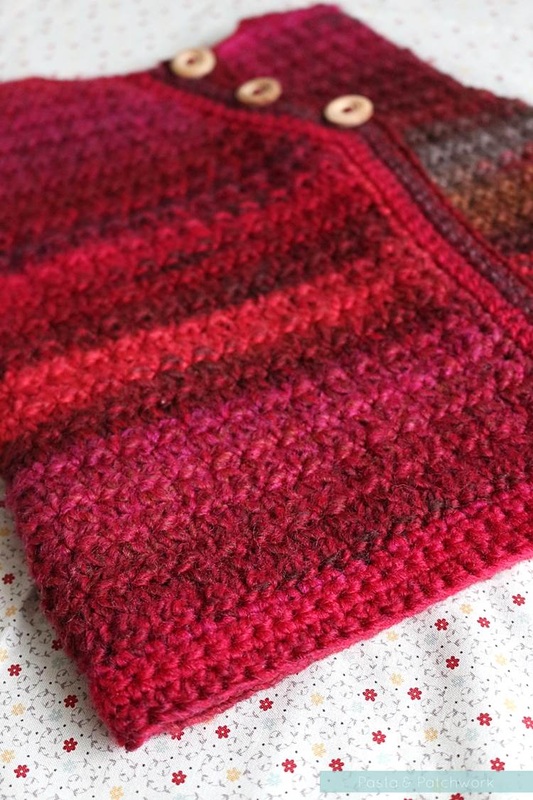
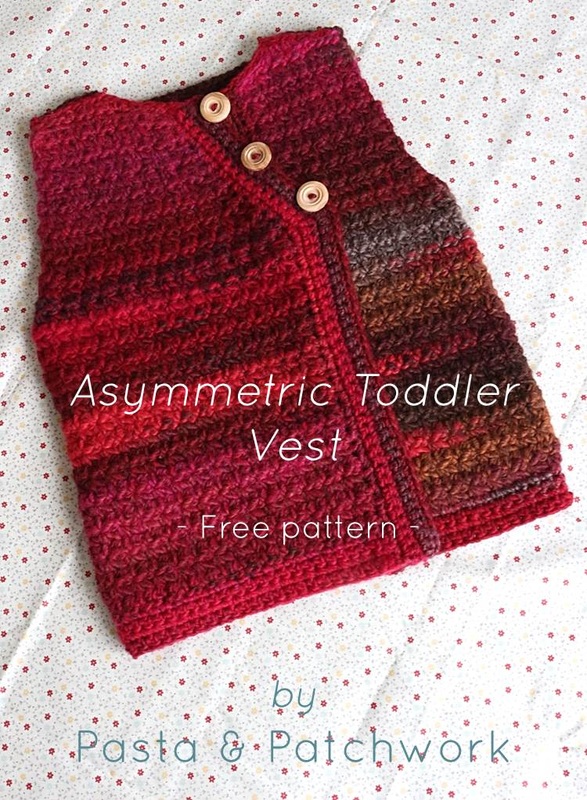
Rainbow Red! The name alone... As soon as I saw it, I knew it was destined for a woolly toddler wonder, something to keep the Bean warm in the winter months but not too warm. Something to add deep, rich colour to the drabness of January. Add some pretty wooden buttons, an interesting asymmetric detail, and voila:
Rainbow Red! The name alone... As soon as I saw it, I knew it was destined for a woolly toddler wonder, something to keep the Bean warm in the winter months but not too warm. Something to add deep, rich colour to the drabness of January. Add some pretty wooden buttons, an interesting asymmetric detail, and voila:

Isn't it lovely? It's actually still a bit big for M, who's only just turned two, but no matter - after all the work I put in it's nice to know he'll be able to wear it next year too!
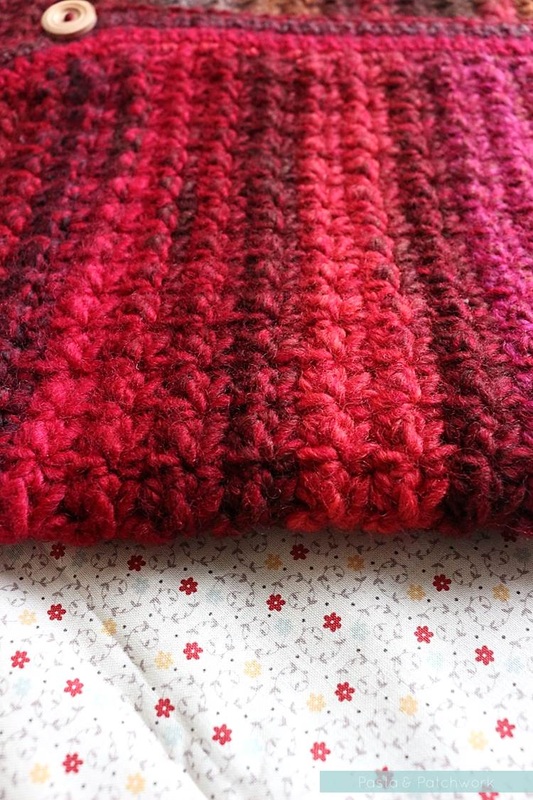
It's thick but supple enough to allow him to move easily in it, and I've kept the border as simple as possible so as not to distract from the more intricate Trinity stitch. Full instructions on how to do this stitch are included below, but it is essentially a cluster of 3 Single Crochets, with the first SC of the cluster being made in the last SC of the previous cluster.
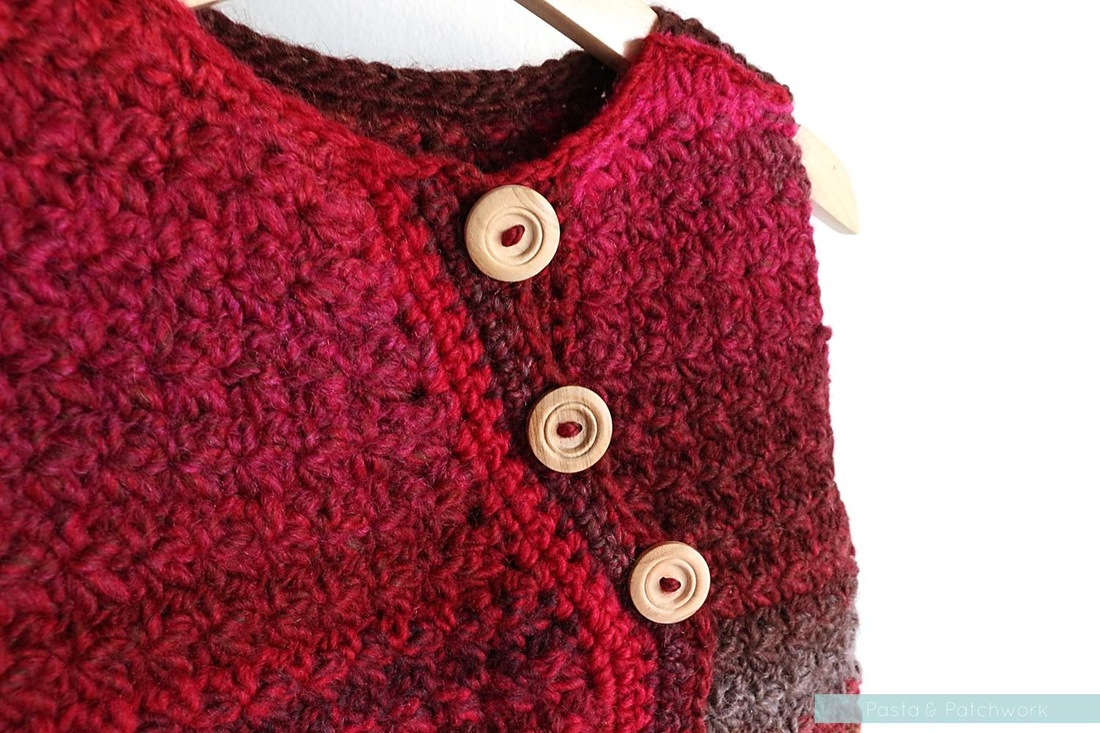
The buttons were a steal at Hobbycraft, and I just adore them!
Asymmetric Toddler Vest
Notes:
US terms
5 mm (H) and 3.5 mm (E) hooks
Lanar DK wool & acrylic mix, ca. 400 yards (360 m)
Colour: Rainbow Red
Garment size: 3-4 y
Gauge: 10 cm = 12 rows
Stitches: Trinity stitch (see below for tutorial) - Tr.st.; single crochet - SC; chain stitch - ch.; slip stitch - sl.st.
US terms
5 mm (H) and 3.5 mm (E) hooks
Lanar DK wool & acrylic mix, ca. 400 yards (360 m)
Colour: Rainbow Red
Garment size: 3-4 y
Gauge: 10 cm = 12 rows
Stitches: Trinity stitch (see below for tutorial) - Tr.st.; single crochet - SC; chain stitch - ch.; slip stitch - sl.st.
BACK PANEL
R1:
Begin with a starting chain of 44 stitches, of which the last will be used for the first st. of the next round.
R2:
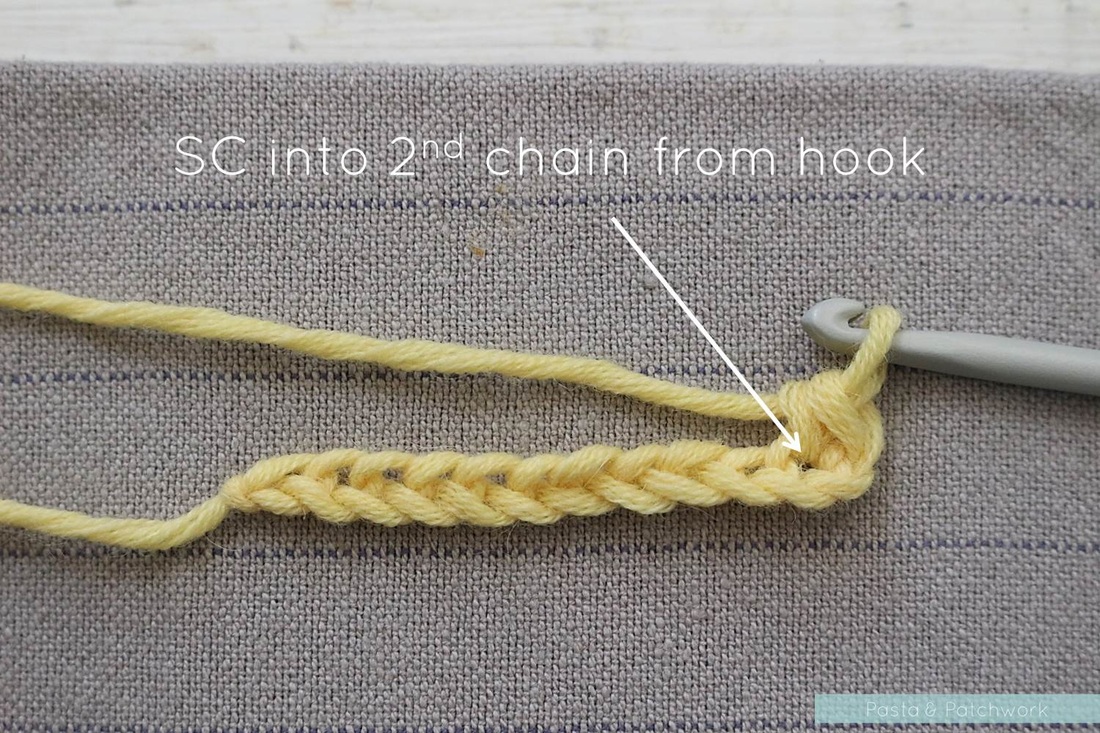
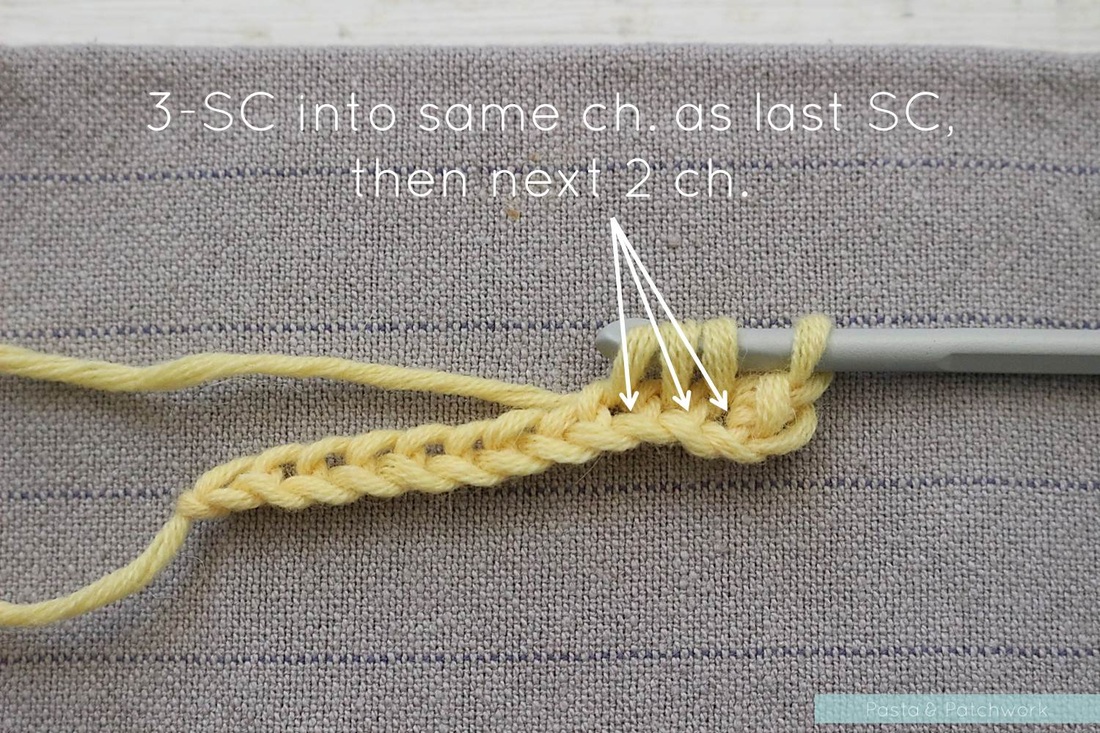
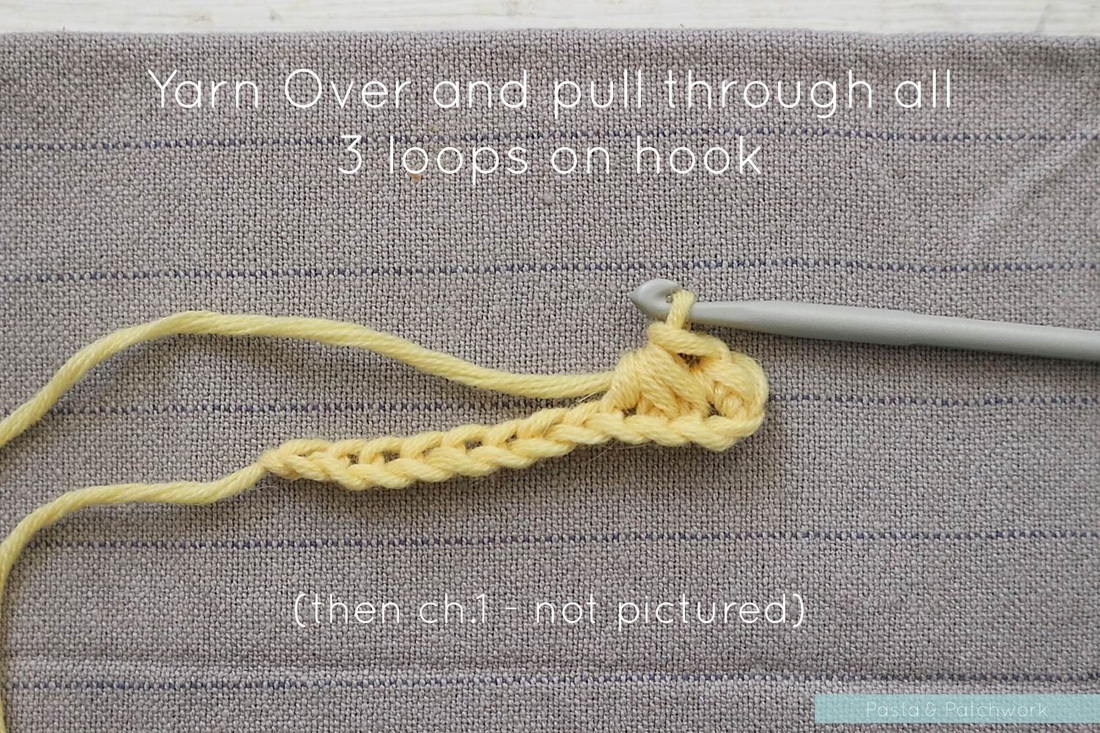
SC 1 in the 2nd ch. from the hook, then make the first Trinity stitch: pull up a loop in the same ch. as that of the last SC, then pull up one loop each in the next two ch. Yarn over and pull through all three loops on the hook. You now have a 3-SC cluster! [see pictures].
R1:
Begin with a starting chain of 44 stitches, of which the last will be used for the first st. of the next round.
R2:
SC 1 in the 2nd ch. from the hook, then make the first Trinity stitch: pull up a loop in the same ch. as that of the last SC, then pull up one loop each in the next two ch. Yarn over and pull through all three loops on the hook. You now have a 3-SC cluster! [see pictures].
R2 (continued):
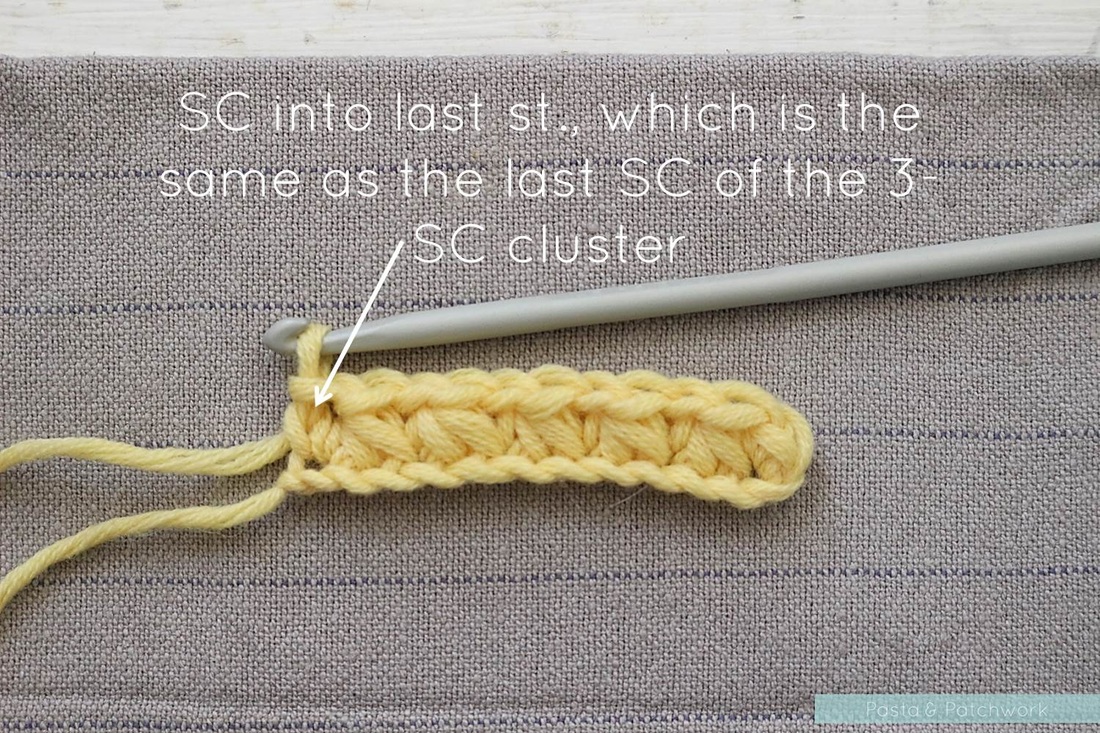
Ch. 1. To make the next Tr.st., pull up a loop in the same ch. of the last SC, then pull up one loop each in the next two ch. Yarn over and pull through all three loops on the hook. *Ch. 1, Tr.st. 1; repeat from * until last ch., then SC 1 in the same ch. as the 3rd SC of the last cluster. Turn (43st.)
Ch. 1. To make the next Tr.st., pull up a loop in the same ch. of the last SC, then pull up one loop each in the next two ch. Yarn over and pull through all three loops on the hook. *Ch. 1, Tr.st. 1; repeat from * until last ch., then SC 1 in the same ch. as the 3rd SC of the last cluster. Turn (43st.)
R3:
Ch. 1, SC 1 in the last SC of the previous round, then Tr.st.. *Ch. 1, Tr.st. 1; repeat from * until last st. SC 1 in the same st. as the 3rd SC of the last Tr.st. Turn (43st.)
Ch. 1, SC 1 in the last SC of the previous round, then Tr.st.. *Ch. 1, Tr.st. 1; repeat from * until last st. SC 1 in the same st. as the 3rd SC of the last Tr.st. Turn (43st.)
R4-23: Repeat R3
Over the next 4 rows, we need to reduce by 6 stiches.
R24:
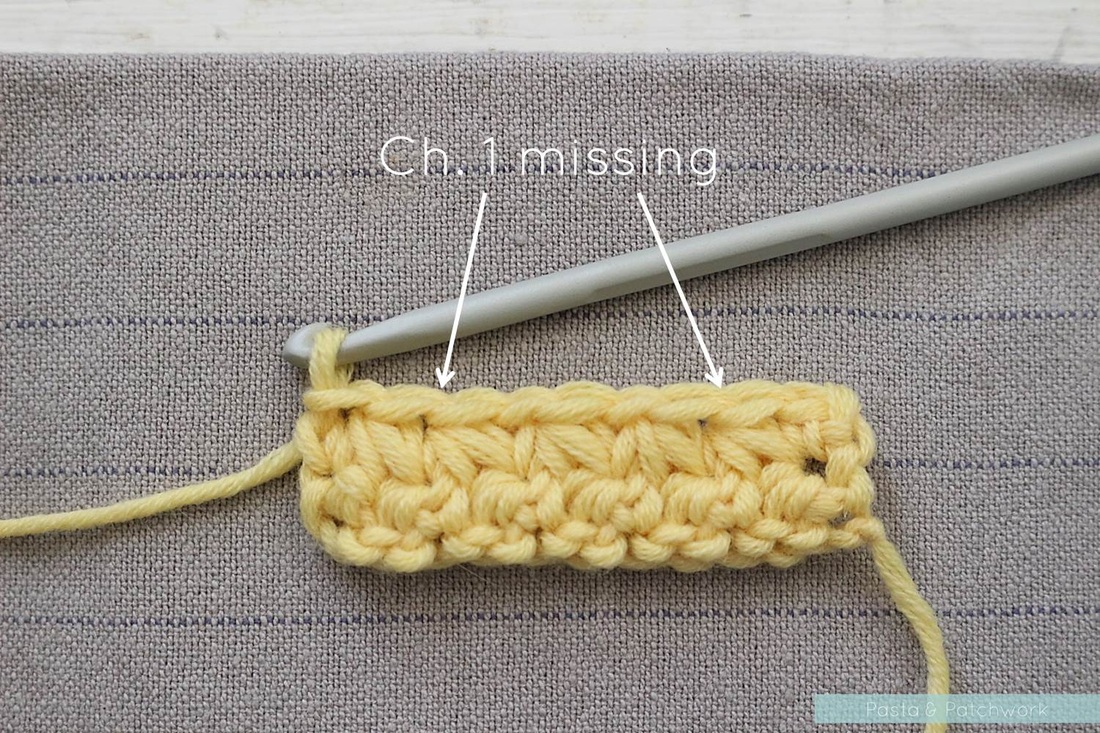
Ch. 1, SC 1 in the last SC of the previous round, then Tr.st. 1. DO NOT CH. 1, but move on to the next Tr.st. immediately. *Ch. 1, Tr.st.; repeat from * until 2 st. remain. DO NOT CH. 1, but move on to the last Tr.st. immediately [The image below shows where you should be skipping a ch. 1].
SC 1 in the same st. as the 3rd SC of the last Tr.st. Turn (41st.)
Over the next 4 rows, we need to reduce by 6 stiches.
R24:
Ch. 1, SC 1 in the last SC of the previous round, then Tr.st. 1. DO NOT CH. 1, but move on to the next Tr.st. immediately. *Ch. 1, Tr.st.; repeat from * until 2 st. remain. DO NOT CH. 1, but move on to the last Tr.st. immediately [The image below shows where you should be skipping a ch. 1].
SC 1 in the same st. as the 3rd SC of the last Tr.st. Turn (41st.)
R25:
Repeat row 24 (39st.)
R26:
Repeat row 3 (39st.)
R27:
Repeat row 24 (37st.)
R28-39:
Repeat R3 (37st.)
Over the next 2 rows, we will make the collar and shoulders.
R40:
Ch1., then sl.st. 4 in the back loop only.
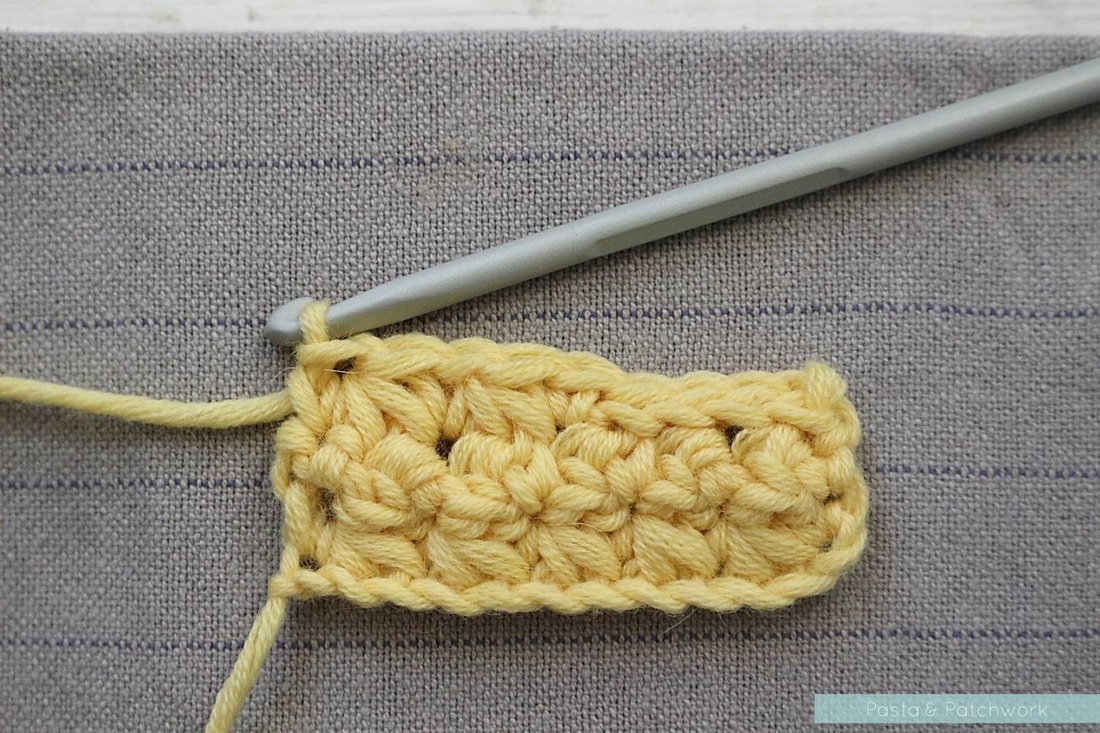
SC 1, then Tr.st. 1, ch.1, Tr.st.1. SC 1 in the same st. as the 3rd SC of the last Tr.st. [You will get a slant, as shown in the picture below]
Sl.st. 19 in the back loop only.
SC 1, then Tr.st. 1, ch.1, Tr.st.1. SC 1 in the same st. as the 3rd SC of the last Tr.st.
Sl.st. 4 in the back loop only. Turn (37st.)
Repeat row 24 (39st.)
R26:
Repeat row 3 (39st.)
R27:
Repeat row 24 (37st.)
R28-39:
Repeat R3 (37st.)
Over the next 2 rows, we will make the collar and shoulders.
R40:
Ch1., then sl.st. 4 in the back loop only.
SC 1, then Tr.st. 1, ch.1, Tr.st.1. SC 1 in the same st. as the 3rd SC of the last Tr.st. [You will get a slant, as shown in the picture below]
Sl.st. 19 in the back loop only.
SC 1, then Tr.st. 1, ch.1, Tr.st.1. SC 1 in the same st. as the 3rd SC of the last Tr.st.
Sl.st. 4 in the back loop only. Turn (37st.)
R41:
Ch. 1, sl.st. 4 in the back loop only.
SC 1, then Tr.st. 1, Ch. 2 (TWO!), Tr.st 1. SC 1 in the same st. as the 3rd SC of the last Tr.st.
Sl.st. 19 in the back loop only.
SC 1, then Tr.st. 1, Ch. 2 (TWO!), Tr.st 1. SC 1 in the same st. as the 3rd SC of the last cluster.
Sl.st. 4 in the back loop only. Cut yarn and tie off. (37st.)
Now we’ll switch to the smaller hook and go back to the bottom of the panel to make the rim. I personally like a slightly tapered look, so there are 35 rather than 37 st. to this rim. This is a matter of preference, however, and you don’t need to stick to it. However, I would advise against going for more than 37 st. as it’ll just make the vest look weird…
R1:
Attach yarn at one end of the panel and ch.1. SC 35 into the bottom loops of the vest, skipping 2 along the way (anywhere but not two consecutively). Turn. (35 st.)
R2-4:
Ch.1 then SC into each st. of the previous row. At the end of the 4th round, cut yarn and tie off. (35 st.)
R1:
Attach yarn at one end of the panel and ch.1. SC 35 into the bottom loops of the vest, skipping 2 along the way (anywhere but not two consecutively). Turn. (35 st.)
R2-4:
Ch.1 then SC into each st. of the previous row. At the end of the 4th round, cut yarn and tie off. (35 st.)
FRONT RIGHT PANEL (the asymmetric panel)
R1:
Begin with a starting chain of 30 stitches, of which the last will be used for the first st. of the next round.
R2:
SC 1 in the 2nd ch. from the hook, then Tr.st.. *Ch. 1, Tr.st. 1; repeat from * until last ch., then SC 1 in the same ch. as the 3rd SC of the last Tr.st. Turn (29st.)
R3:
Ch. 1, SC 1 in the last SC of the previous round, then Tr.st.. *Ch. 1, Tr.st. 1; repeat from * until last st. SC 1 in the same st. as the 3rd SC of the last Tr.st. Turn (29st.)
R4-23:
Repeat R3
Over the next 16 rows, we need to bring in one side to form the armhole, and make the other side slant diagonally to give this vest its asymmetric look.
R24:
Ch. 1, SC 1 in the last SC of the previous round, then Tr.st. 1. DO NOT CH. 1, but move on to the next Tr.st. immediately. *Ch. 1, Tr.st. 1; repeat from * until 2 st. remain. DO NOT CH. 1, but move on to the last Tr.st. immediately. SC 1 in the same st. as the 3rd SC of the last Tr.st. Turn (27st.)
R25:
Repeat row 24 (25st.)
R26:
Repeat row 3 (25st.)
R27:
Repeat row 24 (23st.)
R28:
Ch. 1, SC 1 in the last SC of the previous round, then Tr.st. 1. DO NOT CH. 1, but move on to the next Tr.st immediately. *Ch. 1, Tr.st. 1; repeat from * until last ch., then SC 1 in the same ch. as the 3rd SC of the last Tr.st. Turn (22st.)
R29:
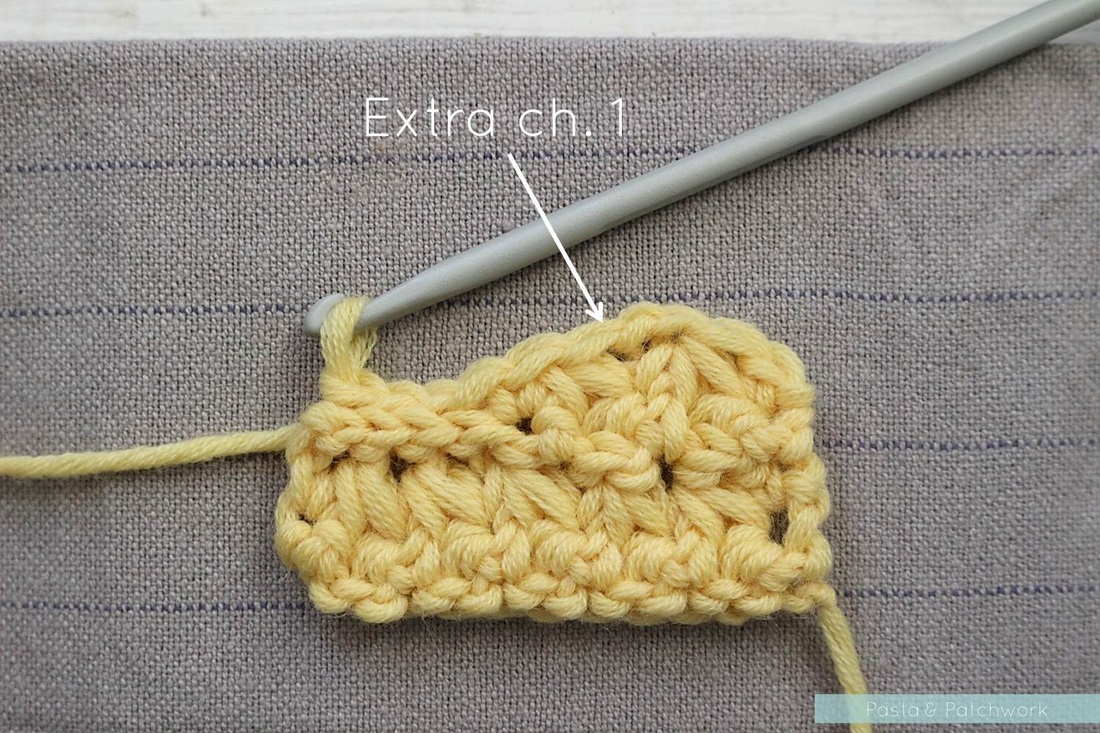
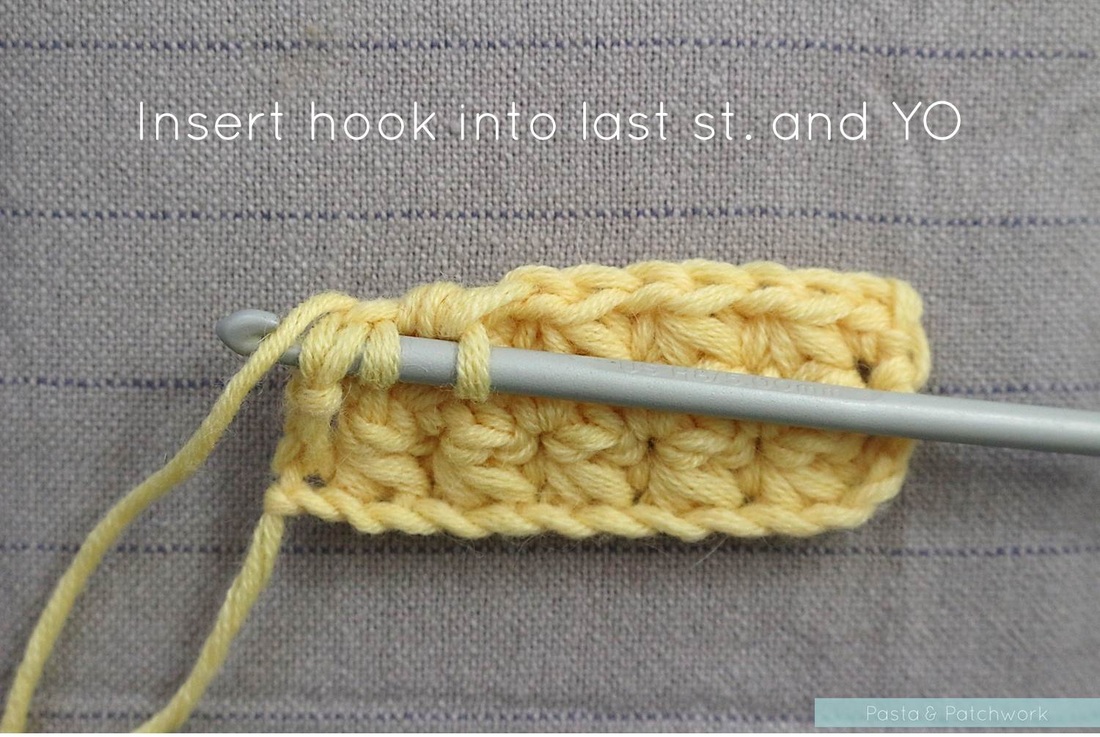
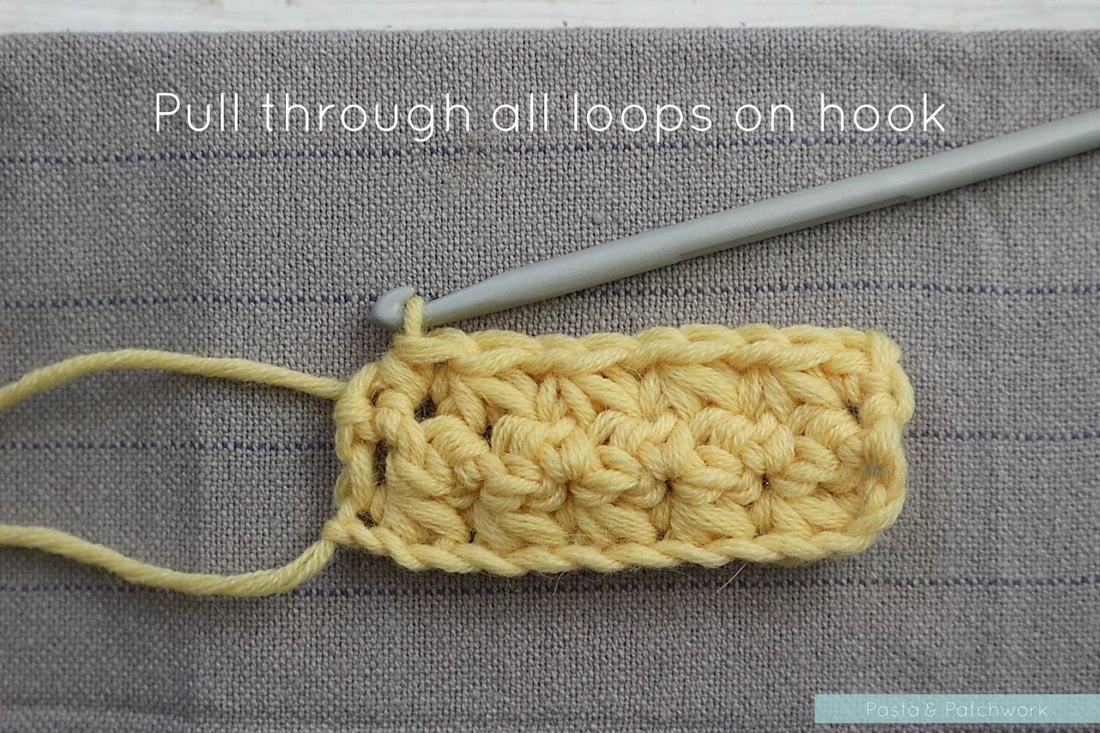
Ch. 1, SC 1 in the last SC of the previous round, then Tr.st. 1. *Ch. 1, Tr.st. 1; repeat from * until 1 st. remains. Make a 2SC-tog by pulling up a loop in the same st. as the 3rd SC of the last Tr.st., inserting the hook into the last st. of the row, YO then pulling through all 3 loops on the hook [see picture]. Turn (21st.)
R1:
Begin with a starting chain of 30 stitches, of which the last will be used for the first st. of the next round.
R2:
SC 1 in the 2nd ch. from the hook, then Tr.st.. *Ch. 1, Tr.st. 1; repeat from * until last ch., then SC 1 in the same ch. as the 3rd SC of the last Tr.st. Turn (29st.)
R3:
Ch. 1, SC 1 in the last SC of the previous round, then Tr.st.. *Ch. 1, Tr.st. 1; repeat from * until last st. SC 1 in the same st. as the 3rd SC of the last Tr.st. Turn (29st.)
R4-23:
Repeat R3
Over the next 16 rows, we need to bring in one side to form the armhole, and make the other side slant diagonally to give this vest its asymmetric look.
R24:
Ch. 1, SC 1 in the last SC of the previous round, then Tr.st. 1. DO NOT CH. 1, but move on to the next Tr.st. immediately. *Ch. 1, Tr.st. 1; repeat from * until 2 st. remain. DO NOT CH. 1, but move on to the last Tr.st. immediately. SC 1 in the same st. as the 3rd SC of the last Tr.st. Turn (27st.)
R25:
Repeat row 24 (25st.)
R26:
Repeat row 3 (25st.)
R27:
Repeat row 24 (23st.)
R28:
Ch. 1, SC 1 in the last SC of the previous round, then Tr.st. 1. DO NOT CH. 1, but move on to the next Tr.st immediately. *Ch. 1, Tr.st. 1; repeat from * until last ch., then SC 1 in the same ch. as the 3rd SC of the last Tr.st. Turn (22st.)
R29:
Ch. 1, SC 1 in the last SC of the previous round, then Tr.st. 1. *Ch. 1, Tr.st. 1; repeat from * until 1 st. remains. Make a 2SC-tog by pulling up a loop in the same st. as the 3rd SC of the last Tr.st., inserting the hook into the last st. of the row, YO then pulling through all 3 loops on the hook [see picture]. Turn (21st.)
R30:
Repeat row 3. Turn (21st.)
R31:
Ch. 1, SC 1 in the last SC of the previous round, then Tr.st. 1. *Ch. 1, Tr.st. 1; repeat from * until 2 st. remain. DO NOT CH. 1, but move on to the last Tr.st. immediately. SC 1 in the same st. as the 3rd SC of the last Tr.st. Turn (20st.)
R32:
Repeat row 28, but add one extra SC at end. Turn (19st.)
R33:
Repeat row 31. Turn (18st.)
R34:
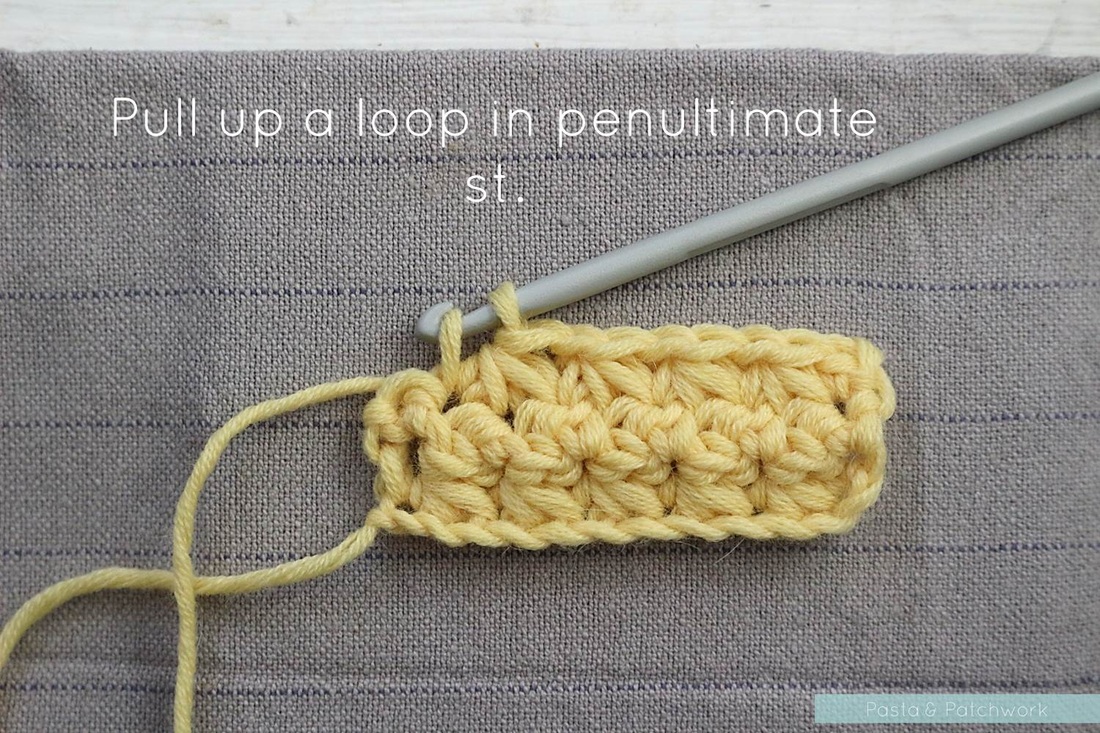
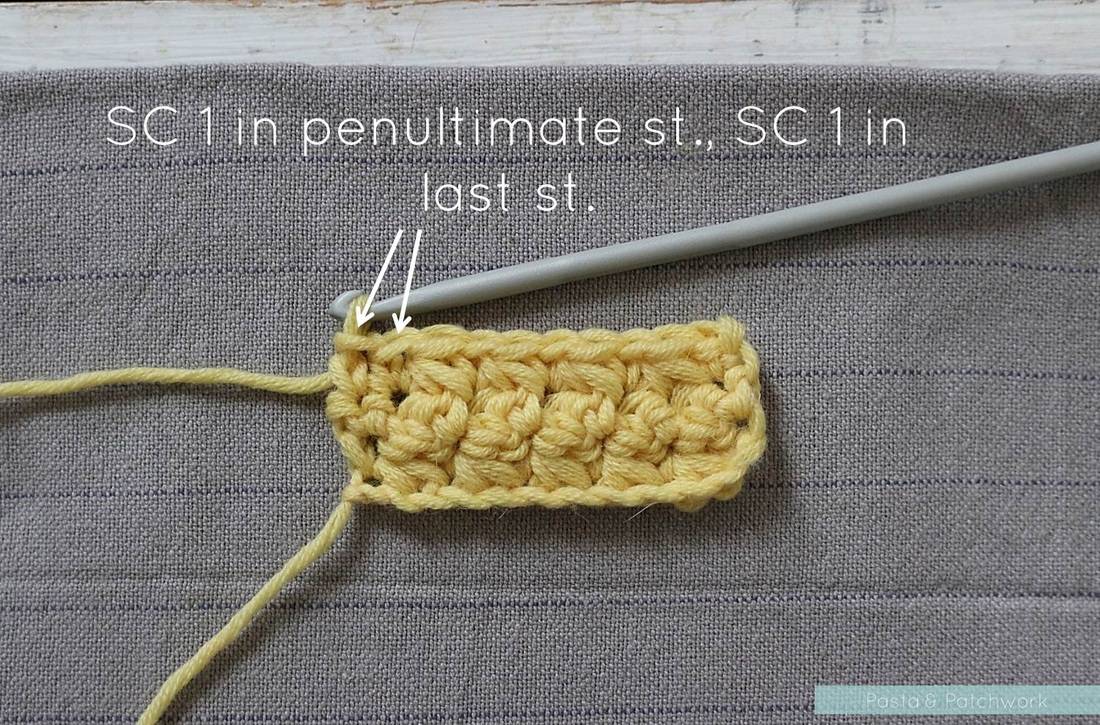
Ch. 1, SC 1 in the last SC of the previous round, then Tr.st 1. *Ch. 1, Tr.st. 1; repeat from * until 1 st. remains. DO NOT CH. 1, but SC 1 into the 3rd SC of the previous cluster, then SC 1 into the last st. of the previous row [see picture]. Turn (17st.)
Repeat row 3. Turn (21st.)
R31:
Ch. 1, SC 1 in the last SC of the previous round, then Tr.st. 1. *Ch. 1, Tr.st. 1; repeat from * until 2 st. remain. DO NOT CH. 1, but move on to the last Tr.st. immediately. SC 1 in the same st. as the 3rd SC of the last Tr.st. Turn (20st.)
R32:
Repeat row 28, but add one extra SC at end. Turn (19st.)
R33:
Repeat row 31. Turn (18st.)
R34:
Ch. 1, SC 1 in the last SC of the previous round, then Tr.st 1. *Ch. 1, Tr.st. 1; repeat from * until 1 st. remains. DO NOT CH. 1, but SC 1 into the 3rd SC of the previous cluster, then SC 1 into the last st. of the previous row [see picture]. Turn (17st.)
R35:
Repeat row 3. Turn (17st.)
R36:
Repeat row 28. Turn (16st.)
R37:
Repeat row 29. Turn (15st.)
R38:
Repeat row 3. Turn (15st.)
R39:
Repeat row 31. Turn (14st.)
Over the next 2 rows, we will make the collar and shoulder.
R40:
Ch. 1, sl.st. 5 in the back loop only.
SC 1, then Tr.st. 1, ch. 1, Tr.st. 1. SC 1 in the same st. as the 3rd SC of the last Tr.st.
Sl.st. 4 in the back loop only. Turn (14st.)
R41:
Ch. 1, sl.st. 4 in the back loop only.
SC 1, then Tr.st. 1, ch. 2 (TWO!), Tr.st. 1. SC 1 in the same st. as the 3rd SC of the last Tr.st.
Sl.st. 5 in the back loop only. Cut yarn and tie off (14st.)
Now we’ll switch to the smaller hook and go back to the bottom of the panel to make the rim.
R1:
Attach yarn at one end of the panel and ch.1.
SC 27 into the bottom loops of the vest, skipping 2 along the way (anywhere). Turn. (27 st.)
R2-4:
Ch.1 then SC into each st. of the previous row. At the end of the 4th round, cut yarn and tie off. (27 st.)
Continuing with the smaller hook, we’ll now make the side rim with the button holes.
R1:
Attach yarn at one end of the panel and ch.1.
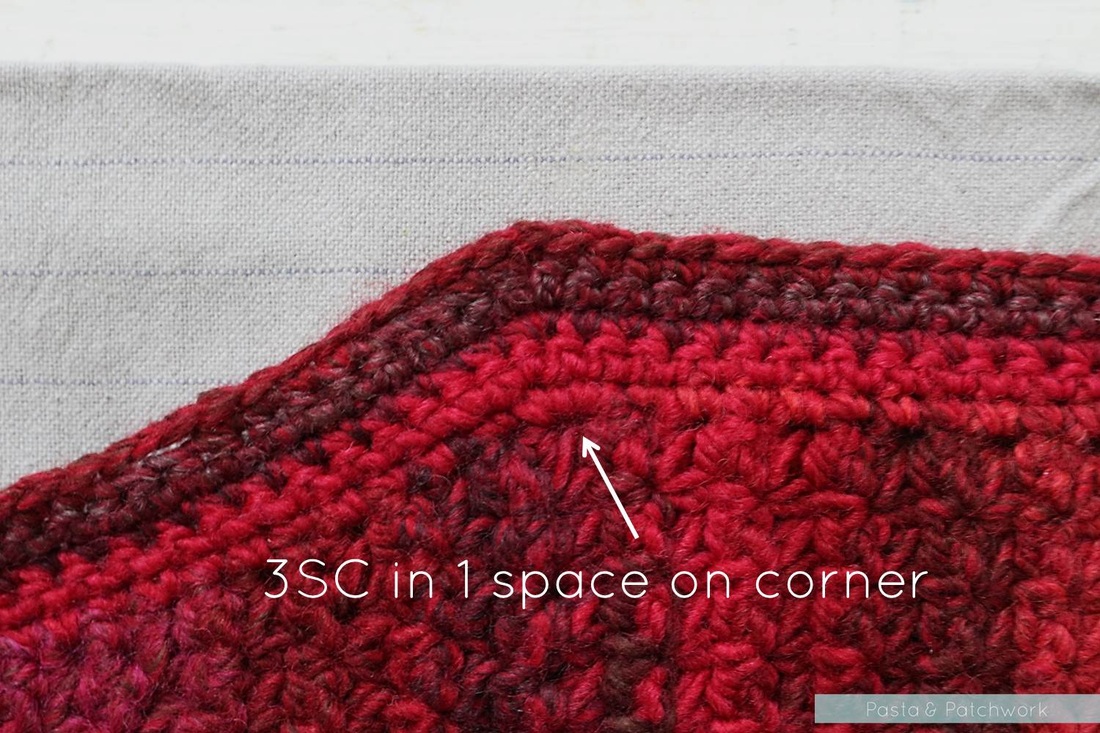
SC 32 into the side edge of the vest, until you get to the “bump” where the slanted part of the panel starts. SC 3 together into the corner, the SC 15 into the slanted side of the panel. Turn (55st.)
Repeat row 3. Turn (17st.)
R36:
Repeat row 28. Turn (16st.)
R37:
Repeat row 29. Turn (15st.)
R38:
Repeat row 3. Turn (15st.)
R39:
Repeat row 31. Turn (14st.)
Over the next 2 rows, we will make the collar and shoulder.
R40:
Ch. 1, sl.st. 5 in the back loop only.
SC 1, then Tr.st. 1, ch. 1, Tr.st. 1. SC 1 in the same st. as the 3rd SC of the last Tr.st.
Sl.st. 4 in the back loop only. Turn (14st.)
R41:
Ch. 1, sl.st. 4 in the back loop only.
SC 1, then Tr.st. 1, ch. 2 (TWO!), Tr.st. 1. SC 1 in the same st. as the 3rd SC of the last Tr.st.
Sl.st. 5 in the back loop only. Cut yarn and tie off (14st.)
Now we’ll switch to the smaller hook and go back to the bottom of the panel to make the rim.
R1:
Attach yarn at one end of the panel and ch.1.
SC 27 into the bottom loops of the vest, skipping 2 along the way (anywhere). Turn. (27 st.)
R2-4:
Ch.1 then SC into each st. of the previous row. At the end of the 4th round, cut yarn and tie off. (27 st.)
Continuing with the smaller hook, we’ll now make the side rim with the button holes.
R1:
Attach yarn at one end of the panel and ch.1.
SC 32 into the side edge of the vest, until you get to the “bump” where the slanted part of the panel starts. SC 3 together into the corner, the SC 15 into the slanted side of the panel. Turn (55st.)
R2:
Ch.1, SC 1 each into the first 16 st. of the previous row. SC 2 in the 17th st., SC 2 in the 18th st.
Continue making SC 1 into each st. of the previous row. Turn (57st.)
R3:
Ch. 1, SC 1 each into the first 32 st. of the previous row. SC 2 in the 33rd st., then continue making SC 1 into each st. of the previous row. Turn (58st.)
R4:
Ch.1, SC 1 each into the first 19 st. of the previous row. SC 2 in the 20th st., then continue making SC 1 into each st. of the previous row. Turn (59st.)
R5:
Ch. 1, SC 1 each into the first 33 st. of the previous row. SC 2 in the 34th st., then SC 1 into the next st.
Skip 3 st. and ch. 3, SC 4, skip 3 and ch. 3, SC 4, skip 3 and ch. 3, SC 1.
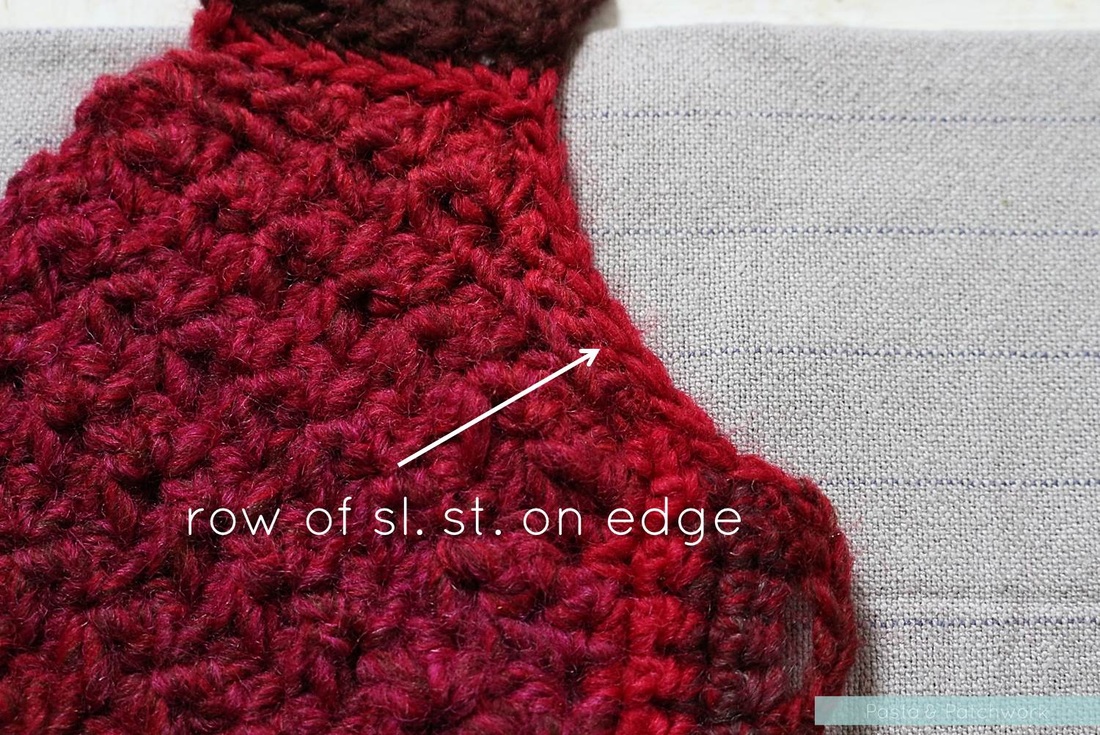
Carry on to the collar and shoulder of the panel: sl.st. 1 into the side of the rows of SCs and each st. of the collar & shoulder to make the edge neat.
Ch.1, SC 1 each into the first 16 st. of the previous row. SC 2 in the 17th st., SC 2 in the 18th st.
Continue making SC 1 into each st. of the previous row. Turn (57st.)
R3:
Ch. 1, SC 1 each into the first 32 st. of the previous row. SC 2 in the 33rd st., then continue making SC 1 into each st. of the previous row. Turn (58st.)
R4:
Ch.1, SC 1 each into the first 19 st. of the previous row. SC 2 in the 20th st., then continue making SC 1 into each st. of the previous row. Turn (59st.)
R5:
Ch. 1, SC 1 each into the first 33 st. of the previous row. SC 2 in the 34th st., then SC 1 into the next st.
Skip 3 st. and ch. 3, SC 4, skip 3 and ch. 3, SC 4, skip 3 and ch. 3, SC 1.
Carry on to the collar and shoulder of the panel: sl.st. 1 into the side of the rows of SCs and each st. of the collar & shoulder to make the edge neat.
FRONT LEFT PANEL
R1:
Begin with a starting chain of 18 stitches, of which the last will be used for the first st. of the next round.
R2:
SC 1 in the 2nd ch. from the hook, then Tr.st. 1. *Ch. 1, Tr.st. 1; repeat from * until last ch., then SC 1 in the same ch. as the 3rd SC of the last Tr.st. Turn (17st.)
R3:
Ch. 1, SC 1 in the last SC of the previous round, then Tr.st. 1. *Ch. Tr.st. 1; repeat from * until last ch., then SC 1 in the same ch. as the 3rd SC of the last Tr.st. Turn (17st.)
R4-23:
Repeat R3
Over the next 16 rows, we need to bring in one side to form the armhole, while the other side remains straight.
R24:
Ch. 1, SC 1 in the last SC of the previous round, then Tr.st 1. DO NOT CH. 1, but move on to the next Tr.st. immediately. *Ch. 1, Tr.st. 1; repeat from* until last ch., then SC 1 in the same ch. as the 3rd SC of the last Tr.st. Turn (16st.)
R25:
Ch. 1, SC 1 in the last SC of the previous round, then Tr.st. 1. *Ch. 1, Tr.st. 1; repeat from * until 1 st. remains. Make a 2SC-tog by pulling up a loop in the same st. as the 3rd SC of the last Tr.st., inserting the hook into the last st. of the row, YO then pulling through all 3 loops on the hook. Turn (15st.)
R26:
Repeat row 3 (15st.)
R27:
Ch. 1, SC 1 in the last SC of the previous round, then Tr.st. 1. *Ch. 1, Tr.st. 1; repeat from * until 2 st. remain. DO NOT CH. 1, but move on to the last Tr.st. immediately. SC 1 in the same st. as the 3rd SC of the last Tr.st. Turn (14st.)
R28-39:
Ch. 1, SC 1 in the last SC of the previous round, then Tr.st 1. *Ch. 1, Tr.st. 1; repeat from * until 1 st. remains. DO NOT CH. 1, but SC 1 into the 3rd SC of the previous cluster, then SC 1 into the last st. of the previous row. Turn (14st.)
Over the next 2 rows, we will make the collar and shoulder.
R40:
Ch. 1, sl.st. 4 in the back loop only.
SC 1, then Tr.st.1, ch. 1, Tr.st.1. SC 1 in the same st. as the 3rd SC of the last Tr.st.
Sl.st. 5 in the back loop only. Turn (14st.)
R41:
Ch. 1, sl.st. 5 in the back loop only.
SC 1, then Tr.st.1, ch. 2 (TWO!), Tr.st.1. SC 1 in the same st. as the 3rd SC of the last Tr.st.
Sl.st. 4 in the back loop only. Cut yarn and tie off (14st.)
Now we’ll switch to the smaller hook and go back to the bottom of the panel to make the rim.
R1:
Attach yarn at one end of the panel and ch.1.
SC 15 into the bottom loops of the vest, skipping 2 along the way (anywhere). Turn. (15st.)
R2-4:
Ch.1 then SC 1 into each st. of the previous row. At the end of the 4th round, cut yarn and tie off. (15st.)
Continuing with the smaller hook, we’ll now make the side rim.
R1:
Attach yarn at the top end of the panel and ch.1. SC 44 into the side edge of the vest. Turn (44st.)
R2-4:
Ch.1 then SC 1 into each st. of the previous row. At the end of the 4th round, cut yarn and tie off. (44st.)
Carry on to the collar and shoulder of the panel: sl.st. 1 into the side of the rows of SCs and each st. of the collar & shoulder to make the edge neat.
And there are your three panels! Weave in any ends, then block all three panels (really, do - it makes a huge difference to the final finish) and sew them together using a wool needle. Attach the buttons, remembering they go on a diagonal! All done.
Written pattern copyright Eline Alcocer 2015. You are welcome to make and use this pattern as you wish, but please do not sell the pattern nor claim the pattern as your own. Please link back to this page if you write about the pattern in any way. Thank you and happy crocheting!
Come say hello:

I'm linking up with Moogly and Petals to Picots for Hookin on Hump Day #88